Что такое ahk и для чего его используют? как скачать и установить этот язык программирования?
Содержание:
Short-circuit Boolean Evaluation
When AND, OR, and the are used within an , they short-circuit to enhance performance (regardless of whether any function calls are present). Short-circuiting operates by refusing to evaluate parts of an expression that cannot possibly affect its final result. To illustrate the concept, consider this example:
if (ColorName != "" AND not FindColor(ColorName))
    MsgBox %ColorName% could not be found.
In the example above, the FindColor() function never gets called if the ColorName variable is empty. This is because the left side of the AND would be false, and thus its right side would be incapable of making the final outcome true.
Because of this behavior, it’s important to realize that any side-effects produced by a function (such as altering a global variable’s contents) might never occur if that function is called on the right side of an AND or OR.
It should also be noted that short-circuit evaluation cascades into nested ANDs and ORs. For example, in the following expression, only the leftmost comparison occurs whenever ColorName is blank. This is because the left side would then be enough to determine the final answer with certainty:
if (ColorName = "" OR FindColor(ColorName, Region1) OR FindColor(ColorName, Region2))
    break   ; Nothing to search for, or a match was found.
As shown by the examples above, any expensive (time-consuming) functions should generally be called on the right side of an AND or OR to enhance performance. This technique can also be used to prevent a function from being called when one of its parameters would be passed a value it considers inappropriate, such as an empty string.
: The also short-circuits by not evaluating the losing branch.
Send variants
Send: By default, Send is synonymous with SendEvent; but it can be made a synonym for SendInput or SendPlay via SendMode.
SendRaw: Similar to Send, except that all characters in Keys are interpreted and sent literally. See for details.
SendInput and SendPlay : SendInput and SendPlay use the same syntax as Send but are generally faster and more reliable. In addition, they buffer any physical keyboard or mouse activity during the send, which prevents the user’s keystrokes from being interspersed with those being sent. SendMode can be used to make Send synonymous with SendInput or SendPlay. For more details about each mode, see and below.
SendEvent : SendEvent sends keystrokes using the same method as the pre-1.0.43 Send command. The rate at which keystrokes are sent is determined by SetKeyDelay.
Language Syntax
When are quotation marks used with commands and their parameters?
Double quotes («) have special meaning only within . In all other places, they are treated literally as if they were normal characters. However, when a script launches a program or document, the operating system usually requires quotes around any command-line parameter that contains spaces, such as in this example: .
When exactly are variable names enclosed in percent signs?
Variable names are always enclosed in percent signs except in cases illustrated in bold below:
- In parameters that are input or output variables:
- On the left side of an assignment:
- On the left side of traditional (non-expression) if-statements:
- Everywhere in . For example:
If (Var1 <> Var2)
      Var1 := Var2 + 100
For further explanation of how percent signs are used, see and . Percent signs can also have other meanings:
- The causes a command parameter to be interpreted as an expression.
- Escaped percent signs () and percent signs in have no special meaning (they are interpreted as literal percent signs).
When should percent signs and commas be escaped?
Literal percent signs must be escaped by preceding them with an accent/backtick. For example: Literal commas must also be escaped () except when used in MsgBox or the last parameter of any command (in which case the accent is permitted but not necessary).
When commas or percent signs are enclosed in quotes within an , the accent is permitted but not necessary. For example: .
Скачать AutoHotkey
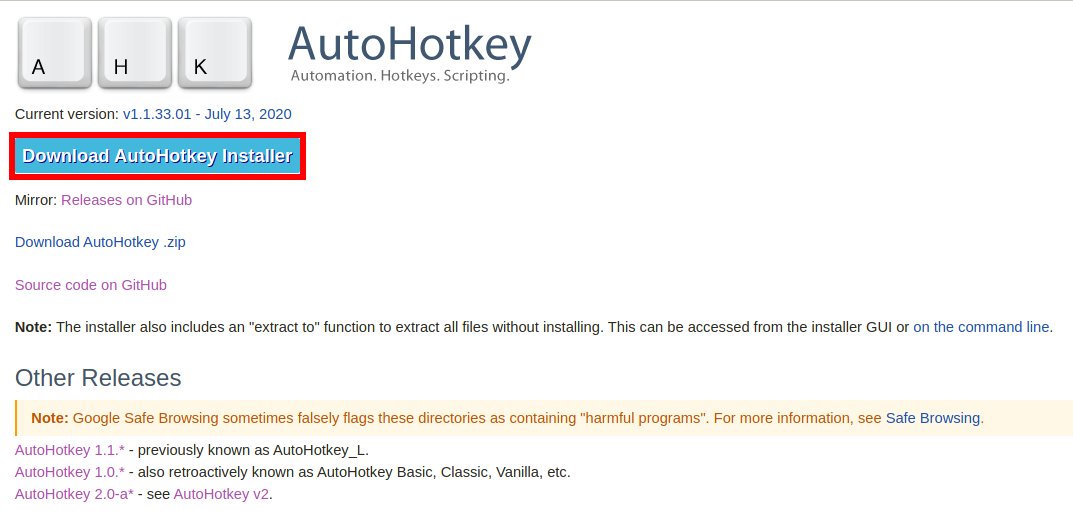
Там представлено несколько несколько версий, разберёмся в них:
- AutoHotkey 1.1.* — это актуальная версия, которая активно разрабатывается. Ранее была известна как AutoHotkey_L.
- AutoHotkey 1.0.* — развитие этой версии остановлено несколько лет назад, ранее была известна как AutoHotkey Basic, Classic, Vanilla.
- AutoHotkey 2.0-a* — альфа выпуск новой версии AutoHotkey v2.
Ветка AutoHotkey 2.0-a* является работоспособной, но в ней поменялся синтаксис языка по этой причине большинство готовых скриптов, которые вы можете найти в Интернете, в ней работать не будут.
То есть скачиваем версию AutoHotkey 1.1.*. Если вы хотите скачать установщик, то нажмите на кнопку «Download AutoHotkey Installer». Для скачивания портативной версии нажмите «Download AutoHotkey .zip».
Скачайте установщик, им проще пользоваться, чем портативной версией.
Специальные клавиши
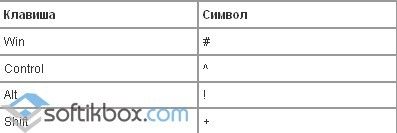
При необходимости вы можете сделать так, чтобы программа автоматически нажимала специальные клавиши, такие как «Ctrl», «Shift» и «Alt». К примеру, используя команду «Send ^с!{tab}», вы делаете так, чтобы программа использовала автоматическую вставку, а потом сразу же переключалась на другое окно.
Символ «^» в данном случае указывает программе использовать сначала клавишу «Ctrl», в то время как «!» представляет собой клавишу «Alt». Соответственно, команда «{tab}», как и говорилось выше, дает программе установку использовать кнопку «Tab». Чтобы не вызвать никаких проблем и конфликтов в процессе работы программы, вам следует использовать кириллицу, так как клавиши будут чаще всего совпадать с нынешней раскладкой клавиатуры.
Более подробно ознакомиться со списком специальных символов вы сможете непосредственно через меню «Справка» в самой программе.
Чтобы обеспечить более быструю печать в окне любой программы, вы можете воспользоваться так называемыми горячими строчками. По сути, это различные макросы, которые позволяют вам писать одинаковые сообщения, но вместо того, чтобы тратить на них большое количество времени, вполне достаточно будет нажать определенную комбинацию клавиш.
К примеру, можно сделать так, чтобы сокращение «бгф» использовалось для ввода в чат длинной фразы, такой как, например, «берегись, кинул гранату, это флешка». Делается это с помощью следующей команды:
При этом сразу стоит отметить, что для работоспособности скрипта нужно будет после введенного сокращения нажать на «пробел» или просто поставить запятую.
8 — Other Helpful Goodies
We have reached the end of our journey, my good friend. I hope you have learned something. But before we go, here are some other things that I think you should know. Enjoy!
a. The mysterious square brackets
Throughout the documentation, you will see these two symbols ( and ) surrounding code in the yellow syntax box at the top of almost all pages. Anything inside of these brackets are OPTIONAL. Meaning the stuff inside can be left out if you don’t need them. When writing your code, it is very important to NOT type the square brackets in your code.
On the ControlGetText page you will see this:
ControlGetText, OutputVar , Control, WinTitle, WinText, ExcludeTitle, ExcludeText
So you could simply do this if you wanted:
ControlGetText, OutputVar
Or add in some more details:
ControlGetText, OutputVar, Control, WinTitle
What if you wanted to use ExcludeTitle but not fill in WinText or WinTitle? Simple!
ControlGetText, OutputVar, Control,,, ExcludeTitle
Please note that you cannot IGNORE parameters, but you can leave them blank. If you were to ignore , it would look like this and cause issues:
ControlGetText, OutputVar, Control, ExcludeTitle
b. Finding your AHK version
Run this code to see your AHK version:
MsgBox, %A_AhkVersion%
Or look for «AutoHotkey Help File» or «AutoHotkey.chm» in the start menu or your installation directory.
c. Trial and Error
Trial and Error is a very common and effective way of learning. Instead of asking for help on every little thing, sometimes spending some time alone (sometimes hours or days) and trying to get something to work will help you learn faster.
If you try something and it gives you an error, study that error. Then try to fix your code. Then try running it again. If you still get an error, modify your code some more. Keep trying and failing until your code fails no more. You will learn a lot this way by reading the documentation, reading errors and learning what works and what doesn’t. Try, fail, try, fail, try, try, try, fail, fail, succeed!
This is how a lot of «pros» have learned. But don’t be afraid to ask for help, we don’t bite (hard). Learning takes time, the «pros» you encounter did not learn to be masters in just a few hours or days.
«If at first you don’t succeed, try, try, try again.» — Hickson, William E.
d. Indentation
This stuff (indentation) is very important! Your code will run perfectly fine without it, but it will be a major headache for you and other to read your code. Small code (25 lines or less) will probably be fine to read without indentation, but it’ll soon get sloppy. It’s best you learn to indent ASAP. Indentation has no set style, but it’s best to keep everything consistent.
«What is indentation?» you ask? It’s simply spacing to break up your code so you can see what belongs to what. People usually use 3 or 4 spaces or 1 tab per «level».
Not indented:
if (car = "old")
{
MsgBox, The car is really old.
if (wheels = "flat")
{
MsgBox, This car is not safe to drive.
return
}
else
{
MsgBox, Be careful! This old car will be dangerous to drive.
}
}
else
{
MsgBox, My`, what a shiny new vehicle you have there.
}
Indented:
if (car = "old")
{
    MsgBox, The car is really old.
    if (wheels = "flat")
    {
        MsgBox, This car is not safe to drive.
        return
    }
    else
    {
        MsgBox, Be careful! This old car will be dangerous to drive.
    }
}
else
{
    MsgBox, My`, what a shiny new vehicle you have there.
}
See Wikipedia’s Indentation style page for various styles and examples. Choose what you like or learn to indent how you think it’s easiest to read.
e. Asking for Help
Before you ask, try doing some research yourself or try to code it yourself. If that did not yield results that satisfy you, read below.
- Don’t be afraid to ask for help, even the smartest people ask others for help.
- Don’t be afraid to show what you tried, even if you think it’s silly.
- Post anything you have tried.
- Pretend everyone but you is a doorknob and knows nothing. Give as much information as you can to educate us doorknobs at what you are trying to do. Help us help you.
- Be patient.
- Be polite.
- Be open.
- Be kind.
- Enjoy!
If you don’t get an answer right away, wait at least 1 day (24 hours) before asking for more help. We love to help, but we also do this for free on our own time. We might be at work, sleeping, gaming, with family or just too busy to help.
And while you wait for help, you can try learning and doing it yourself. It’s a good feeling, making something yourself without help.
Dynamically Calling a Function
: A function (even a ) may be called dynamically via percent signs. For example, would call the function whose name is contained in Var. Similarly, would call Func1() or Func2(), etc., depending on the current value of A_Index.
: Var in can contain a function name or a function object. If the function does not exist, the ‘s __Call meta-function is invoked instead.
If the function cannot be called due to one of the reasons below, the evaluation of the expression containing the call stops silently and prematurely, which may lead to inconsistent results:
- Calling a nonexistent function, which can be avoided by using . Except for , the called function’s must exist explicitly in the script by means such as #Include or a non-dynamic call to a .
- Passing too few parameters, which can be avoided by checking ‘s return value (which is the number of mandatory parameters plus one). : Note that passing too many parameters is tolerated; each extra parameter is fully evaluated (including any calls to functions) and then discarded.
Finally, a dynamic call to a function is slightly slower than a normal call because normal calls are resolved (looked up) before the script begins running.
SendPlay [v1.0.43+]
Warning: SendPlay may have no effect at all if UAC is enabled, even if the script is running as an administrator. For more information, refer to the .
SendPlay’s biggest advantage is its ability to «play back» keystrokes and mouse clicks in a broader variety of games than the other modes. For example, a particular game may accept only when they have the .
Of the three sending modes, SendPlay is the most unusual because it does not simulate keystrokes and mouse clicks per se. Instead, it creates a series of events (messages) that flow directly to the active window (similar to ControlSend, but at a lower level). Consequently, SendPlay does not trigger hotkeys or hotstrings.
Like , SendPlay’s keystrokes do not get interspersed with keystrokes typed by the user. Thus, if the user happens to type something during a SendPlay, those keystrokes are postponed until afterward.
Although SendPlay is considerably slower than SendInput, it is usually faster than the traditional mode (even when KeyDelay is -1).
Both Win (LWin and RWin) are automatically blocked during a SendPlay if the keyboard hook is installed. This prevents the Start Menu from appearing if the user accidentally presses Win during the send. By contrast, keys other than LWin and RWin do not need to be blocked because the operating system automatically postpones them until after the SendPlay (via buffering).
SendPlay does not use the standard settings of SetKeyDelay and SetMouseDelay. Instead, it defaults to no delay at all, which can be changed as shown in the following examples:
SetKeyDelay, 0, 10, Play  ; Note that both 0 and -1 are the same in SendPlay mode.
SetMouseDelay, 10, Play
SendPlay is unable to turn on or off CapsLock, NumLock, or ScrollLock. Similarly, it is unable to change a key’s state as seen by unless the keystrokes are sent to one of the script’s own windows. Even then, any changes to the left/right modifier keys (e.g. RControl) can be detected only via their neutral counterparts (e.g. Control). Also, SendPlay has other limitations described on the .
Unlike and , the user may interrupt a SendPlay by pressing Ctrl+Alt+Del or Ctrl+Esc. When this happens, the remaining keystrokes are not sent but the script continues executing as though the SendPlay had completed normally.
Although SendPlay can send LWin and RWin events, they are sent directly to the active window rather than performing their native operating system function. To work around this, use . For example, would show the Start Menu’s Run dialog.
Mouse Wheel Hotkeys
Hotkeys that fire upon turning the mouse wheel are supported via the key names WheelDown and WheelUp. Here are some examples of mouse wheel hotkeys:
MButton & WheelDown::MsgBox You turned the mouse wheel down while holding down the middle button.
^!WheelUp::MsgBox You rotated the wheel up while holding down Control+Alt.
: WheelLeft and WheelRight are also supported, but have no effect on operating systems older than Windows Vista. Some mice have a single wheel which can be scrolled up and down or tilted left and right. Generally in those cases, WheelLeft or WheelRight signals are sent repeatedly while the wheel is held to one side, to simulate continuous scrolling. This typically causes the hotkeys to execute repeatedly.
: The built-in variable A_EventInfo contains the amount by which the wheel was turned, which is typically 1. However, A_EventInfo can be greater or less than 1 under the following circumstances:
- If the mouse hardware reports distances of less than one notch, A_EventInfo may contain 0;
- If the wheel is being turned quickly (depending on type of mouse), A_EventInfo may be greater than 1. A hotkey like the following can help analyze your mouse: .
Some of the most useful hotkeys for the mouse wheel involve alternate modes of scrolling a window’s text. For example, the following pair of hotkeys scrolls horizontally instead of vertically when you turn the wheel while holding down the left Ctrl:
~LControl & WheelUp::  ; Scroll left.
ControlGetFocus, fcontrol, A
Loop 2  ; <-- Increase this value to scroll faster.
    SendMessage, 0x0114, 0, 0, %fcontrol%, A  ; 0x0114 is WM_HSCROLL and the 0 after it is SB_LINELEFT.
return

~LControl & WheelDown::  ; Scroll right.
ControlGetFocus, fcontrol, A
Loop 2  ; <-- Increase this value to scroll faster.
    SendMessage, 0x0114, 1, 0, %fcontrol%, A  ; 0x0114 is WM_HSCROLL and the 1 after it is SB_LINERIGHT.
return
Finally, since mouse wheel hotkeys generate only down-events (never up-events), they cannot be used as .
Основные возможности
- автоматизация различных действий путем эмуляции нажатия определенных клавиш на мыши и клавиатуре;
- написание или запись макросов с использованием рекордера;
- назначение горячих клавиш;
- быстрая расшифровка аббревиатур;
- создание произвольных форм для ввода информации;
- изменение назначения любых клавиш;
- обработка сигналов, переданных внешними устройствами управления;
- преобразование скриптов;
- управление громкостью и другими настройками звуковых карт;
- выполнение мониторинга системы;
- изменение содержимого в буфере обмена;
- отображение на экране надписей и диалоговых окон;
- автоматизация действий в играх;
- любые операции с текстовыми файлами и др.
Плюсы и минусы
Плюсы:
- автоматический запуск практически любых операций на ПК;
- встроенный скриптовый язык;
- переназначение любых клавиш;
- поддержка разных устройств для вывода.
Минусы:
некоторые сложности в освоении.
Похожие программы
Auto-Clicker. Программа для запоминания и последующего воспроизведения всех действий компьютерной мыши. Записанные действия в ней можно повторять произвольное количество раз, настраивая скорость их воспроизведения.
Macro Recorder. Приложение, которое может автоматизировать все рутинные процессы на компьютере. С его помощью можно создавать макросы, которые будут самостоятельно запускать необходимые программы, выполнять клики мышкой, вводить текст и т. д.
Как пользоваться приложением
Для того чтобы с помощью программы назначить автоматическое выполнение какого-либо действия, нужно создать скрипт. Он представляет собой всплывающее окно с пометкой «Я рогалег». С этой целью используем команду MsgBox, которую можно вызвать любым текстом. Надпись и команду необходимо вписать в любой текстовый редактор, так как сама программа как такового отдельного окна не имеет. Далее сохраняем файл, обязательно указав для него расширение «ahk». Скрипт будет выполнен при нажатии на него двойным щелчком.
Выполнение скрипта
При запуске скрипта появится значок «Autohotkey». Нажав на него правой кнопкой, вы сможете выбрать необходимые команды.
Выбор команд
Код, который должен автоматически выполняться при запуске скрипта, помещается вверху файла. Идентификаторы нужно указывать для горячих клавиш.
Рассмотрим, как это действует, на примере назначения автоматического запуска блокнота Notepad++ при нажатии определенных клавиш.
Для начала набираем «#n:: Run notepad++» и сохраняем файл. Дважды щелкаем по нему и набираем команду «Win+n». В области уведомления появится значок, а программа будет запущена при нажатии указанной комбинации клавиш.
В команде значок «#n» определяет кнопки, «::» — разделяет обозначения самих клавиш от команд. Остальные базовые кнопки обозначаются таким образом:
 Обозначения кнопок
AutoHotkey поможет легко и быстро выполнять любые операции и действия, которые вам приходится часто производить на своем ПК.
Parameters
- Keys
-
The sequence of keys to send. As with other commands, the comma in front of the first parameter is optional.
By default (that is, if neither SendRaw nor the or is used), the characters have a special meaning. The characters represent the modifier keys Ctrl, Shift, Alt and Win. They affect only the very next key. To send the corresponding modifier key on its own, enclose the key name in braces. To just press (hold down) or release the key, follow the key name with the word «down» or «up» as shown below.
Symbol Key Press Release Examples ^ {Ctrl} {Ctrl down} {Ctrl up} presses Ctrl+Home + {Shift} {Shift down} {Shift up} sends the text «AbC» presses Alt+Shift+A ! {Alt} {Alt down} {Alt up} presses Alt+A # {LWin}{RWin} {LWin down}{RWin down} {LWin up}{RWin up} holds down Win and then presses E Note: As capital letters are produced by sending Shift, produces a different effect in some programs than . For example, presses Alt+Shift+A and presses Alt+A. If in doubt, use lowercase.
The characters are used to enclose , and to send special characters literally. For example, is Tab and is a literal exclamation mark.
: Enclosing a plain ASCII letter (a-z or A-Z) in braces forces it to be sent as the corresponding virtual keycode, even if the character does not exist on the current keyboard layout. In other words, produces the letter «a» while may or may not produce «a», depending on the keyboard layout. For details, see the .
Return, Exit, and General Remarks
If the flow of execution within a function reaches the function’s closing brace prior to encountering a Return, the function ends and returns a blank value (empty string) to its caller. A blank value is also returned whenever the function explicitly omits Return’s parameter.
When a function uses the Exit command to terminate the current thread, its caller does not receive a return value at all. For example, the statement would leave unchanged if exits. The same thing happens if a function causes a runtime error such as running a nonexistent file (when is not in effect).
A function may alter the value of ErrorLevel for the purpose of returning an extra value that is easy to remember.
To call a function with one or more blank values (empty strings), use an empty pair of quotes as in this example: .
Since calling a function does not start a new thread, any changes made by a function to settings such as SendMode and SetTitleMatchMode will go into effect for its caller too.
The caller of a function may pass a nonexistent variable or array element to it, which is useful when the function expects the corresponding parameter to be . For example, calling would create the variable automatically as a or global (depending on whether the caller is inside a function and whether it has the in effect).
When used inside a function, ListVars displays a function’s along with their contents. This can help debug a script.
1 — The Basics
Before we begin our journey, let me give some advice. Throughout this tutorial you will see a lot of text and a lot of code. For optimal learning power, it is advised that you read the text and try the code. Then, study the code. You can copy and paste most examples on this page. If you get confused, try reading the section again.
a. Downloading and installing AutoHotkey
Since you’re viewing this documentation locally, you’ve probably already installed AutoHotkey and can skip to section b.
Before learning to use AutoHotkey (AHK), you will need to download it. After downloading it, you may possibly need to install it. But that depends on the version you want. For this guide we will use the Installer since it is easiest to set up.
Text instructions:
- Go to the AutoHotkey Homepage: https://www.autohotkey.com/
- Click Download: https://www.autohotkey.com/download/ahk-install.exe
- During installation of AutoHotkey, you will be asked to choose from UNICODE or ANSI. In short, you would probably want to choose UNICODE. It has support for non-English letters and numbers (characters). Keep going until you see an Install button.
- Once done, great! Continue on to section b.
For a video instruction, watch
Install and Hello World on YouTube.
b. How to create a script
Once you have AutoHotkey installed, you will probably want it to do stuff. AutoHotkey is not magic, we all wish it was, but it is not. So we will need to tell it what to do. This process is called «Scripting».
Text instructions:
- Right-Click on your desktop.
- Find «New» in the menu.
- Click «AutoHotkey Script» inside the «New» menu.
- Give the script a new name. It must end with a .ahk extension. For example: MyScript.ahk
- Find the newly created file on your desktop and right-click it.
- Click «Edit Script».
- A window should have popped up, probably Notepad. If so, SUCCESS!
So now that you have created a script, we need to add stuff into the file. For a list of all built-in commands, function and variables, see .
Here is a very basic script containing a hotkey which types text using the Send command when the hotkey is pressed:
^j::
Send, My First Script
return
We will get more in-depth later on. Until then, here’s an explanation of the above code:
- The first line: is the hotkey. means Ctrl, is the letter J. Anything to the left of are the keys you need to press.
- The second line: is how you send keystrokes. is the command, anything after the comma (,) will be typed.
- The third line: . This will become your best friend. It literally stops code from going any further, to the lines below. This will prevent many issues when you start having a lot of stuff in your scripts.
- Save the File.
- Double-click the file/icon in the desktop to run it. Open notepad or (anything you can type in) and press Ctrl and J.
- Hip Hip Hooray! Your first script is done. Go get some reward snacks then return to reading the rest of this tutorial.
For a video instruction, watch Install and Hello World on YouTube.
c. You cannot merge commands
When you are making your code, you might have the urge to put several commands on the same line or inside of each other, don’t. we’ll talk about why it doesn’t work as you might expect and what you can do instead.
d. How to find the help file on your computer
There are a few ways to do this, I’ll assume you have it installed to the default locations:
Method 1:
- Find the Start menu or Start Orb on your screen, usually in the lower left.
- Click Programs or All Programs.
- Find AutoHotkey in the list.
- You should then see AutoHotkey Help File. Click it.
- Done!
Method 2:
- Go to your desktop.
- Find My Computer or Computer. Open it.
- Go into your harddrive that contains AutoHotkey. Probably C:\ drive.
- Search within all Program Files folders for AutoHotkey.
- Look for AutoHotkey.chm or a file that says AutoHotkey and has a yellow question mark on it.
- Done!