Fancybox: подключение к странице сайта
Содержание:
Что нового в Fancybox 2?
И так что нового было добавлено в этот релиз за последнее время:
- Расширен набор вспомогательных функций;
- Отзывчивость (всплывающие окошки теперь масштабируются в зависимости от размера окна браузера);
- Добавлено слайдшоу;
- Новые эффекты переходов между изображениями в галерее;
- Fancybox полностью переведен на CSS3 (тени, скругление углов и прочее);
- Обновлен плагин настроек (не имеет обратной совместимости);
- Теперь выпускается под лицензией Creative Commons Attribution-NonCommercial 3.0, ознакомится с которой можно по этой ссылке: http://creativecommons.org/licenses/by-nc/3.0/
Bad Results
Bad news. While my solution involving the meta viewport headers worked beautifully in emulators, it would not work in vivo on the iPad, which was one of the chief devices I needed it on.
It’s difficult to describe the sheer quantity of atypical and unpredictable behaviors the iPad exhibited on both Safari and Chrome when interacting with fancybox, both alone and with my code. It would break in senseless places, revert to old values suddenly in the middle of testing, change margins, zoom out to unnecessary locations, fail to zoom at all, so on and so forth.
I remember the very clear situation where changing the meta tag in fancybox’s resulted in abnormal zooms 50% of the time until the function was loaded with commands that turned that number to 100% of the time and revealed something about beforeClose itself was impeding the tag changes from taking effect (perhaps animations). Remembering that, and with no debugger, it’s difficult for me to figure out if fancybox is impeding these meta header changes. I know even with all my meta tags commented out, I have observed the ipad zoom out after exiting an incorrectly positioned lightbox, after which the lightbox worked correctly.
The lightbox works in a confusing sweet spot: If I am zoomed between 100% of the page showing and at exact 1-to-1 pixel screen resolution, the lightbox works. If I zoomed any closer in, the meta tags zoom the background around but not out to necessary values. Even adding in max and min scale values had no effect, it stayed as zoomed as ever.
This problem has beaten me. Every single other iOS and Android developer I can find online? This is their solution: Change the meta tags. It works on their iPads. It’s what works in all of their examples. It’s what’s in all the stack overflow questions and answers.
It’s simply not okay for me to remove pinch zoom for my users. I work with schools, there are basic accessibility rules I have to follow, and one of them is to never disable zoom.
Advanced
Helpers provide a simple mechanism to extend the capabilities of fancyBox. There are two built-in helpers — ‘overlay’ and ‘title’.
You can disable them, set custom options or enable other helpers. Examples:
$(".fancybox").fancybox({ helpers{ titlenull}});$(".fancybox").fancybox({ helpers{ overlay null}});$(".fancybox").fancybox({ helpers{ title { type 'inside'}, overlay { css {'background''rgba(255,255,255,0.5)'}}}});$(".fancybox").fancybox({ helpers{ thumbs { width50, height50}}});
Also available are event driven callback methods. The keyword refers to the current or upcoming object (depends on callback method). Here is how you can change title:
$(".fancybox").fancybox({beforeLoadfunction(){this.title='Image '+(this.index+1)+' of '+this.group.length+(this.title?' - '+this.title'');}});
It`s possible to open fancyBox programmatically in various ways:
$.fancybox('<div><h1>Lorem Lipsum</h1><p>Lorem lipsum</p></div>',{ title 'Custom Title'});$.fancybox($("#inline"),{ title 'Custom Title'});$.fancybox({ href'example.jpg', title 'Custom Title'});$.fancybox({ href'example1.jpg', title 'Custom Title 1'},{ href'example2.jpg', title 'Custom Title 2'},{ padding});
There are several methods that allow you to interact with and manipulate fancyBox, example:
$.fancybox.close();
There is a simply way to access wrapping elements using JS:
$.fancybox.wrap$.fancybox.skin$.fancybox.outer$.fancybox.inner
You can override CSS to customize the look. For example, make navigation arrows always visible,
change width and move them outside of area (use this snippet after including fancybox.css):
.fancybox-navspan{visibilityvisible;}.fancybox-nav{width80px;}.fancybox-prev{left-80px;}.fancybox-next{right-80px;}
In that case, you might want to increase space around box:
$(".fancybox").fancybox({ margin 20,60,20,60});
Advanced
Helpers provide a simple mechanism to extend the capabilities of fancyBox. There are two built-in helpers — ‘overlay’ and ‘title’.
You can disable them, set custom options or enable other helpers. Examples:
Also available are event driven callback methods. The keyword refers to the current or upcoming object (depends on callback method). Here is how you can change title:
It`s possible to open fancyBox programmatically in various ways:
There are several methods that allow you to interact with and manipulate fancyBox, example:
There is a simply way to access wrapping elements using JS:
You can override CSS to customize the look. For example, make navigation arrows always visible,
change width and move them outside of area (use this snippet after including fancybox.css):
In that case, you might want to increase space around box:
How to use
To get started, download the plugin, unzip it and copy files to your website/application directory.
Load files in the section of your HTML document. Make sure you also add the jQuery library.
Create your links with a if you want a title to be shown, and add a class:
If you have a set of related items that you would like to group,
additionally include a group name in the (or ) attribute:
Initialise the script like this:
May also be passed an optional options object which will extend the default values. Example:
Tip: Automatically group and apply fancyBox to all images:
Script uses the attribute of the matched elements to obtain the location of the content and to figure out content type you want to display.
You can specify type directly by adding classname (fancybox.image, fancybox.iframe, etc) or attribute:
Note, ajax requests are subject to the same origin policy.
If fancyBox will not be able to get content type, it will try to guess based on ‘href’ and will quit silently if would not succeed.
(this is different from previsous versions where ‘ajax’ was used as default type or an error message was displayed).
Support
- Help
- FAQ
You can ask a questions using the StackOverflow site where you are most likely to get answer quickly as many Javascript experts spend time on the site. Make sure you add the tags «jquery» and «fancybox» when posting.
If you run into an issue and need to report a bug, please create an issue on GitHub issues and I will investigate. But do not forget to check FAQ, first!
Follow @thefancyapps for the latest updates.
1. It doesn’t work at all. The image opens up in a new page. What’s wrong?
Check if you have included all files and set up FancyBox correctly.
Look for JavaScript error messages, they might help you to locate the problem.
If you see something like Uncaught TypeError: undefined is not a function:
1) Check if fancybox.js file is indeed loaded
2) Check if you have not included jQuery library more than once
2. Can a FancyBox appear over the top of my Flash content?
Yes, read this explanation
3. Can the script be called from an iframe?
If all necessary files are included in the parent window, then you can, like:<a href=»javascript:parent.$.fancybox.open({href : ‘myurl’});»>Open something</a>
4. How can I close FancyBox from other element? ?
Just call $.fancybox.close() on your onClick event
5. I`m using custom urls for images (for example, PHP created images — index.php?action=image&id=123) and FancyBox shows source of image. Why?
FancyBox gueses content type from url but sometimes it can be wrong. The solution is to force your type, like so — $(«.selector»).fancybox({‘type’ : ‘image’});
6. FancyBox is not working on all images, only first one opens. What’s wrong?
If you are using ID as selector $(«#selector»).fancybox(); then switch to classes — $(«.selector»).fancybox();
API и опции к FancyBox 1.3.4
Доступные опции
Влиять на работу плагина fancyBox можно при помощи пользовательских настроек, для этого передайте функции fancybox пользовательскую константу , в которой должны содержаться пользовательские настройки вида .
| Ключ | Значение по умолчанию | Описание |
|---|---|---|
| padding | 10 | Пространство между оболочкой и контеном (изображением) |
| margin | 20 | Пространство между областью просмотра и оболочкой (контейнером FancyBox) |
| opacity | false | Когда true, прозрачность контена меняется при переходах (elastic) |
| modal | false | Когда true, для ‘overlayShow’ ставится ‘true’ и для ‘hideOnOverlayClick’, ‘hideOnContentClick’, ‘enableEscapeButton’, ‘showCloseButton’ ставится ‘false’ |
| cyclic | false | Когда true, то пользователи смогут перейти к первому изображению при достижении последнего изображения, щелкнув по кнопке ‘Вперед’, а также перейти к последнему, находясь на первом, кликнув по кнопке ‘Назад’ |
| scrolling | ‘auto’ | Передает значение для свойства CSS overflow, требуется для скрытия полосы прокрутки. Возможные варианты: ‘auto’, ‘yes’, или ‘no’ |
| width | 560 | Ширина контента для типов ‘iframe’ и ‘swf’. Также ставится для строчного контента, если ‘autoDimensions’ равно ‘false’ |
| height | 340 | Высота контента для типов ‘iframe’ and ‘swf’. Также ставится для строчного контента, если »autoDimensions’ равно ‘false’ |
| autoScale | true | Если true, FancyBox масштабируется в пределах области просмотра. |
| autoDimensions | true |
Для строчного и ajax контента, подгоняет размеры области просмотра к размеру элемента. Убедись, что у него заданы размеры, в противном случае это может привести к непредсказуемым результатам. |
| centerOnScroll | false | Когда true, FancyBox центрируется при прокрутке (скроллинге) страницы |
| ajax | { } | Опции Ajax. Отметьте: ‘error’ и ‘success’ будут перезаписаны FancyBox |
| swf | {wmode: ‘transparent’} | Параметр выставляется для swf объекта |
| hideOnOverlayClick | true | Включает/выключает закрытие FancyBox при клике на странице |
| hideOnContentClick | false | Включает/выключает закрытие FancyBox при клике на контенте |
| overlayShow | true | Включить/выключить фон за пределами FancyBox |
| overlayOpacity | 0.3 | Прозрачность фона за пределами FancyBox (от 0 к 1; по умолчанию — 0.3) |
| overlayColor | ‘#666’ | Цвет фона за пределами FancyBox |
| titleShow | true | Включить/выключить показ атрибута title |
| titlePosition | ‘outside’ | Позиция атрибута title. Можно поставить ‘outside’, ‘inside’ или ‘over’ |
| titleFormat | null | Функция обратного вызова для темизации области title. Вы можете поставить любой html — счетчик в виде изображения или обычную навигацию. |
| transitionIn, transitionOut | ‘fade’ | Эти две настройки контролирует то, как крупное изображение появляется (переход) на экране. Могут принимать значения ‘elastic’, ‘fade’ или ‘none’ |
| speedIn, speedOut | 300 | Скорость fade и elastic переходов в миллисекундах |
| changeSpeed | 300 | Скорость изменения рамки при переходе от одного изображения к другому, в миллисекундах |
| changeFade | ‘fast’ | Скорость проявления контента при смене пунктов галереи |
| easingIn, easingOut | ‘swing’ | Используется, если значения transitionIn, transitionOut равны elastic. Принимают значения easing-плагина |
| showCloseButton | true | Включить/выключить отображение кнопки закрыть |
| showNavArrows | true | Включить/выключить отображение стрелок навигации |
| enableEscapeButton | true | Включить/выключить закрытие FancyBox по нажатию на кнопке Esc |
| onStart | null | Функция, будет вызвана перед попыткой загрузить контент |
| onCancel | null | Функция, будет вызвана после отмены загрузки |
| onComplete | null | Функция, может быть вызвана однажды после показа контента |
| onCleanup | null | Функция, вызывается только перед закрытием |
| onClosed | null | Функция, вызывается один раз после закрытия FancyBox |
Публичные функции
| Метод | Описание |
|---|---|
| $.fancybox.showActivity | Показывает загрузку анимации |
| $.fancybox.hideActivity | Скрывает загрузку анимации |
| $.fancybox.next | Показывает следующий элемент галереи |
| $.fancybox.prev | Показывает предыдущий элемент галереи |
| $.fancybox.pos | Показывает элемент галереи по заданному индексу |
| $.fancybox.cancel | Отменяет загрузку контента |
| $.fancybox.close | Скрывает FancyBoxДля iframe использовать — parent.$.fancybox.close(); |
| $.fancybox.resize | Автоматически подстраивает размеры FancyBox: высота FancyBox подстраивается под высоту контента |
| $.fancybox.center | Центрирует FancyBox в области просмотра |
How to use
To get started, download the plugin, unzip it and copy files to your website/application directory.
Load files in the section of your HTML document. Make sure you also add the jQuery library.
Create your links with a if you want a title to be shown, and add a class:
If you have a set of related items that you would like to group,
additionally include a group name in the (or ) attribute:
Initialise the script like this:
May also be passed an optional options object which will extend the default values. Example:
Tip: Automatically group and apply fancyBox to all images:
Script uses the attribute of the matched elements to obtain the location of the content and to figure out content type you want to display.
You can specify type directly by adding classname (fancybox.image, fancybox.iframe, etc) or attribute:
Modules
fancyBox code is split into several files (modules) that extend core functionality.
You can build your own fancyBox version by excluding unnecessary modules, if needed.
Each one has their own and/or files.
Some modules can be customized and controlled programmatically.
List of all possible options:
Example (show thumbnails on start):
If you would inspect fancyBox instance object, you would find keys that names ar captialized — these are references for each module object.
Also, you would notice that fancyBox uses common naming convention to prefix jQuery objects with .
This is how you, for example, can access thumbnail grid element:
This example shows how to call method that toggles thumbnails:
List of available methods:
Where I Put It
I made use of fancybox’s callback functions, calculated the zoom level that would be necessary to see the lightbox by dividing against the document’s width, and used javascript to set the meta tag during .
It worked.
The result was whenever someone clicked on one of my thumbnails, on mobile and mobile alone, the website would zoom out to bring the full lightbox into view and protect my users from ever getting stuck.
Note on Button Size
The only thing I had to do after zooming out was resize the controls so they’d be visible from so far zoomed out. Remember that tags would not work because the zoom set the new ‘normal’ browser size and made the phone behave as if it were loading the full desktop site. However, by comparing to the full document’s width, I could arrive at a scaling ratio and add css style rules in realtime with javascript.
A Small Bug or «Gotcha»
I tried to zoom back IN to the website after I was done zooming out, by putting » into the function. This didn’t work reliably. Half the time the website would zoom back in, and half the time it would not. I put in a bunch of statements into the callback and now 100% of the time the website would not zoom back in. I determined that somethin fancy-box was doing in or around it’s callback must be interfering with the website’s ability to zoom/transform/resize/translate, likely because fancybox was just about to call on a bunch of animations, and those animations competed with the meta tag for some unknown reason. I took my code and put it into and though the zoom back in is now more abrupt and less graceful, it works 100% of the time.
Setup
You can install fancyBox by linking and to your html file.
Make sure you also load the jQuery library.
Below is a basic HTML template to use as an example:
<!DOCTYPE html>
<html>
<head>
	<meta charset="utf-8">
	<title>My page</title>

	<!-- CSS -->
	<link rel="stylesheet" type="text/css" href="jquery.fancybox.css">
</head>
<body>

	<!-- Your HTML content goes here -->

	<!-- JS -->
	<script src="https://code.jquery.com/jquery-3.1.1.min.js"></script>
	<script src="jquery.fancybox.min.js"></script>
</body>
</html>
Tips:
- Make sure you add the jQuery library first
- If you already have jQuery on your page, you shouldn’t include it second time
- Do not include both fancybox.js and fancybox.min.js files
Использование
Fancybox 3 позволяет вам его очень гибко использовать, есть несколько ключевых возможностей:
- Создать галлерею картинок
- Создать всплывающие окно с видео
- Создать модальное окно с разным поведением
- Загружать данные для галлереии по ajax (например загрузить форму)
И так, начнём смотреть всё по порядку.
Галерея
Галерей пользоваться просто. Оборачиваете вашу каркинку ссылкой с атрибутами и все ваши картинки будут листаться. Пример
<a href="image_1.jpg" data-fancybox="gallery" data-caption="Caption #1">
    <img src="thumbnail_1.jpg" alt="" />
</a>
Данный пример вы так же можете посмотреть на codepen fancybox’а. Смотреть демо. Далее я тоже буду давать ссылки на примеры.
Несколько галерей
Во второй версии fancybox, чтобы создать несколько галерей нужно было дописать атрибут rel или data-group. В третьей версии это изменилось и разработчики ушли от этого. Теперь разные галереи нужно инициализировать JS-сом. Вот так:
$().fancybox({
    selector : '.galeryOne'
});
$().fancybox({
    selector : '.galeryTwo'
});
Хоть удобный (как я считаю) способ инициализации через html-атрибуты разработчики убрали, они в данном функционале сделали так, что в этом случае в галереии появятся и те картинки, которые создадутся динамически.
Видео
Наверное это очень просто. Вы можете просто указать в ссылке атрибут data-fancybox иhref c адресом видео на youtube или vimeo, а также на файл mp4 и он сам его будет «правильно» загружать. Так же у окна вы можете задавать ширину или высоту с помощью атрибутов data-width и data-height или соотношение сторон видео атрибутом data-ratio.
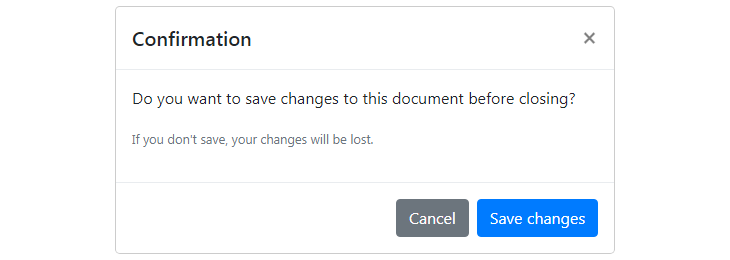
Модальные окна
Чтобы создать модальное окно вам нужно следующие:
- Создать html c содержанием, и дать ему id
- Скрыть его с помощью style=»display:none;»
- У ссылки открывающей окно прописать атрибуты data-fancybox, data-src=»id блока« иhref=»javascript:;»
Вуаля! В итоге у вас получиться что-то типа этого
<a data-fancybox data-src="#modal" href="javascript:;">Open demo</a>
 <div style="display: none;" id="modal">
  <h2>Hello!</h2>
  <p>You are awesome!</p>
</div>
Если вам нужно в модальное окно вставить кнопку закрыть то создайте button с атрибутом data-fancybox-close.
В демо, кстати, есть несколько примеров анимации окон.
Подключение Fancybox к странице сайта
Скачайте архив с плагином, распакуйте его, скопируйте все файлы, включая сценарии js и файлы стилей css в папку на вашем сервер.
Можете сразу же для порядка разместить файлы в зависимости от типа по соответствующим папкам (файлы css в папку styles, файлы js в папку javascripts), но помните что если вы это сделаете, то вам нужно будет убедиться, что пути в CSS файлах к скриптам и пути в файлах JS к фалам стилей соответствуют новому их расположению на вашем сервере. Так же не забудьте подключить к странице последнюю версию библиотеки JQuery (на момент написания поста это версия 2.1.1)
Пример:
<!— Подключаем jQuery библиотеку —>
<script type=»text/javascript» src=»http://code.jquery.com/jquery-latest.min.js»></script>
<!— Подключаем mousewheel плагин (по необходимости, в основном нужен для мобильных устройств) —>
<script type=»text/javascript» src=»/fancybox/lib/jquery.mousewheel-3.0.6.pack.js»></script>
<!— Подключаем непосредственно FancyBox —>
<link rel=»stylesheet» href=»/fancybox/source/jquery.fancybox.css?v=2.1.5″ type=»text/css» media=»screen» />
<script type=»text/javascript» src=»/fancybox/source/jquery.fancybox.pack.js?v=2.1.5″></script>
<!— По необходимости подключаем вспомогательные элементы — стили кнопок, оформление эскизов и/или медиа файлов —>
<link rel=»stylesheet» href=»/fancybox/source/helpers/jquery.fancybox-buttons.css?v=1.0.5″ type=»text/css» media=»screen» />
<script type=»text/javascript» src=»/fancybox/source/helpers/jquery.fancybox-buttons.js?v=1.0.5″></script>
<script type=»text/javascript» src=»/fancybox/source/helpers/jquery.fancybox-media.js?v=1.0.6″></script>
<link rel=»stylesheet» href=»/fancybox/source/helpers/jquery.fancybox-thumbs.css?v=1.0.7″ type=»text/css» media=»screen» />
<script type=»text/javascript» src=»/fancybox/source/helpers/jquery.fancybox-thumbs.js?v=1.0.7″></script>
|
1 |
<!—ПодключаемjQueryбиблиотеку—> <script type=»text/javascript»src=»http://code.jquery.com/jquery-latest.min.js»></script> <!—Подключаемmousewheelплагин(понеобходимости,восновномнужендлямобильныхустройств)—> <script type=»text/javascript»src=»/fancybox/lib/jquery.mousewheel-3.0.6.pack.js»></script> <!—ПодключаемнепосредственноFancyBox—> <link rel=»stylesheet»href=»/fancybox/source/jquery.fancybox.css?v=2.1.5″type=»text/css»media=»screen»/> <script type=»text/javascript»src=»/fancybox/source/jquery.fancybox.pack.js?v=2.1.5″></script> <!—Понеобходимостиподключаемвспомогательныеэлементы-стиликнопок,оформлениеэскизови/илимедиафайлов—> <link rel=»stylesheet»href=»/fancybox/source/helpers/jquery.fancybox-buttons.css?v=1.0.5″type=»text/css»media=»screen»/> <script type=»text/javascript»src=»/fancybox/source/helpers/jquery.fancybox-buttons.js?v=1.0.5″></script> <script type=»text/javascript»src=»/fancybox/source/helpers/jquery.fancybox-media.js?v=1.0.6″></script> <link rel=»stylesheet»href=»/fancybox/source/helpers/jquery.fancybox-thumbs.css?v=1.0.7″type=»text/css»media=»screen»/> <script type=»text/javascript»src=»/fancybox/source/helpers/jquery.fancybox-thumbs.js?v=1.0.7″></script> |
далее создаем ссылки, которые будут вести на элементы, которые мы собираемся открыть с помощью Fancybox (за каламбур прошу простить )
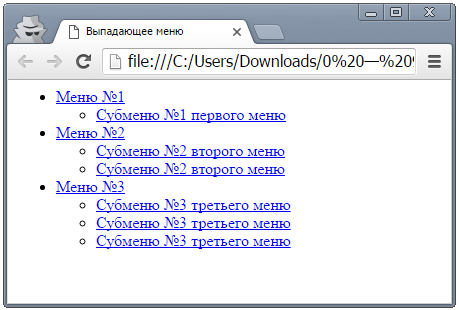
<a class=»fancybox» rel=»group» href=»big_image_1.jpg»><img src=»small_image_1.jpg» alt=»» /></a>
<a class=»fancybox» rel=»group» href=»big_image_2.jpg»><img src=»small_image_2.jpg» alt=»» /></a>
|
1 |
<aclass=»fancybox»rel=»group»href=»big_image_1.jpg»><img src=»small_image_1.jpg»alt=»»/></a> <aclass=»fancybox»rel=»group»href=»big_image_2.jpg»><img src=»small_image_2.jpg»alt=»»/></a> |
Вызывать Fancybox следует только после загрузки страницы как показано ниже. Если вы не знакомы с JQuery, то вам нужно получить хотя бы минимальные знания. Соответствующие курсы можно спокойно найти в интернете.
<script type=»text/javascript»>
$(document).ready(function() {
$(«.fancybox»).fancybox();
});
</script>
|
1 |
<script type=»text/javascript»> $(document).ready(function(){ $(«.fancybox»).fancybox(); }); </script> |
В следующих постах мы на примерах рассмотрим различные варианты использования Fancybox на страницах вашего сайта.
Друзья,
напишите в комментариях стоит ли мне
записать и выложить видео по подключению
данного скрипта как я это сделал тут:
Reviews
http-equiv=»Content-Type» content=»text/html;charset=UTF-8″>lass=»plugin-reviews»>
While this plugin works as expected, customer service is non-existent for the pro version. Tried to renew due to an address change (with a different country), and it presented an error. Reached out to support and four days later with no response. Will go elsewhere.
What an excellent, simple-to-use plugin. It does EXACTLY what I wanted with no programming, configuration or conflict problems!
I needed a lightbox which allowed me to display custom web pages uploaded to my site – specifically, I needed to display HTML5 based animated TRAINING LESSONS generated with eLearning tools. I’ve tried most lightbox plugins on the WordPress site and while they were all great (in their own way) for displaying images, trying to display other content required complicated coding, custom child themes and a fair bit of knowledge of CSS & PHP. I’m no programmer and I use Elementor Pro exclusively so these really didn’t work for me.
Then I found this plugin and it worked PERFECTLY. After installation, all I had to do was create a lessons page in Elementor, drop a text box in place and then enter the URL using the ‘insert/edit link’ from the toolbar. Then, editing the URL link in text mode (just after the ‘<a’ and before “href=”) I inserted the parameter ‘ class=»fancybox-iframe» ’ (note the space before and after) and voilà! I had a clickable URL that produced a lightbox!
Next, I experimented further by using an image box with a screen capture of the lesson, then set the link to ‘custom URL’ and inserted the same URL as before (WITHOUT the parameter – see NOTE below). Once again, it worked perfectly. I was also able to set the lightbox size and fix its position using the WordPress Admin Settings for the lightbox.
Lastly, as I wanted to create an Elementor template (and therefore required the link to be dynamic) I set up a URL field for the course — using ACF (Advanced Custom Fields) — and entered the URL there, then assigned the ACF field to the URL field in the image object’s ‘Custom URL’. Once that was set up, then paging through the lessons dynamically refreshes the URL value, giving you a lightbox unique to each Lesson. PERFECT!
NOTE: For the Elementor image box to work correctly, after you enter the URL, you also need to click on the ‘settings wheel’ beside the entry and then, under the ‘Custom Attributes’ heading, enter the parameter in the format ‘class|fancybox-iframe’ instead of the format used in the textbox above. Note the divider bar – you’ll find it on the bottom-left on your keyboard – and no quotes or spaces.
This has not only solved a MAJOR headache for me which no other plugin I tried seemed capable of, but also produced a perfect lightbox-based interactive lesson display. WELL DONE GUYS! It couldn’t be better!
Perfekt Plugin, does exactlty what it should do and nothing more. This is what i like!
works great
Hallo bestes Lightbox Plugin vielen Dank dafür
Schöne Weihnachten Ihnen
Does exactly what I want. The ability to confine it to specified pages is simple and effective. Thank you.
Installation
WordPress
Quick installation: Install now !
… OR …
Search for “easy fancybox” and install with that slick Plugins > Add New back-end page.
… OR …
Follow these steps:
-
Download archive.
-
Upload the zip file via the Plugins > Add New > Upload page … OR … unpack and upload with your favorite FTP client to the /plugins/ folder.
-
Activate the plugin on the Plug-ins page.
Done! By default, any images that are linked to directly (not to a WordPress page) from within your posts and pages, should now be opening in a FancyBox overlay
Not happy with the default settings? Check out the new options under Settings > Media.
WordPress MU / WordPress 3+ in Multi Site mode
3. Основные настройки
Тут описаны лишь основные настройки. Шаблоны, мобильные и редко используемые конфигурации можно посмотреть в
Пример использования:
$(»).fancybox({
loop: true,
autoFocus: false
});
|
1 |
$(»).fancybox({ looptrue, autoFocusfalse }); |
По умолчанию они имеют следующие значения:
Включает бесконечную навигацию по галерее.
Горизонтальное расстояние между слайдами.
Включает навигацию с помощью клавиатуры.
Запрещает подписи модального окна перекрывать его содержимое. Значение — разрешает.
Показывает навигационные стрелки по краям экрана (для галереи)
Показывает счетчик изображений в верхнем левом углу (для галереи)
Маленькая кнопка закрытия модального окна
— автоматически включена для «html», «inline» или «ajax» окон
— включена для всех окон
— выключена для всех
Показывает тулбар (справа вверху)
— автоматически выключится, если активен
— включен для всех окон
— выключен для всех
Устанавливает, какие кнопки будут показаны в тулбаре
Отключает правую кнопку мыши и использует простую защиту изображений
Делает контент «модальным» — отключает навигацию по клавиатуре, кнопки закрытия и т. д
Анимационный эффект открытия и закрытия окон
— выключен
— увеличение изображения из эскиза и уменьшение в него при закрытии
Продолжительность эффекта анимации
Прозрачность при открытии и закрытии
Эффект перехода между слайдами
Может быть: , , , , , или (без эффекта)
Продолжительность эффекта перехода между слайдами
Скрывает вертикальную полосу прокрутки браузера
Устанавливает фокус на первом фокусируемом элементе после открытия
Ставит фокус обратно на активный элемент после закрытия
Не позволяет пользователю сфокусироваться на элементе вне модального контента
Открывает окна в полный экран
— разрешает перетаскивание содержимого по вертикали
— продолжает движение после освобождения мыши / касания
Автоматически включает слайдшоу с заданной скоростью.
— отображение миниатюр при открытии
— скрывает сетку миниатюр, когда начинается анимация закрытия
— родительский элемент
— вертикальная (y) или горизонтальная (x) прокрутка
Прокрутка изображений колесом мышки
Закрытие окна по клику вне его. — отключает