Faq
Содержание:
Backup and Recovery
Difficulty: Intermediate
Project Core Objective: Protect our users’ work from being lost or corrupted with new backup and recovery mechanisms.
Description:
Older versions of Pencil2D were notorious for corrupting project files. We have
put a lot of work into fixing this and have almost completely eliminated this
very frustrating problem for our users. However we still get the rare report of
being unable to open a file, and changes that we make in the future could
reintroduce this issue unintentionally. We do not want users to have to worry
about ever losing their work, which is why it is important that we implement
effective backup and recovery mechanisms.
The exact mechanisms that we should use are still up for debate, but may
include some combination of the following solutions:
- An option to automatically rename the old project file to a backup when
saving. - Test saves immediately after saving for file integrity.
- Check for project folders in temporary storage on startup and provide the user
the option to recover or remove any of those project which likely are there due
to a crash. - Write files to the disk (in temporary storage) more often in the background
so more work can be recovered with the previous method. - Autosave in the background. We currently have an autosave feature, but due
to it’s intrusive popups most people have it disabled. Running it in the
background would likely lead to greater user adoption.
See the backup proposal for some more details.
- Proposal Tag:
- Skills required: C++, Qt (for recovery dialog)
- Mentor: Connor Deptuck (scribblemaniac)
- Backup Mentor: Matt Chang (chchwy)
What’s New in v0.6.2
New Color Inspector
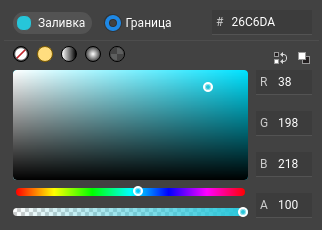
A completely overhauled color inspector. We changed the spinboxes for interactive sliders and a more stylish way to change between HSV / RGB color spaces. This improvement will let you preview colors and alpha values much more easily than before.
New Color Palette Workflow (WIP)
Previously you could change a selected swatch color through the color inspector, but this caused unpredictable alterations to already used colors on both bitmap and vector layers. We are working to improve how swatch colors are handled to preserve custom palettes while drawing.
To improve the creation of custom palettes we implemented Add, Replace and Remove commands through a contextual menu, plus you can now select and delete multiple colors at the same time in both list and grid display mode. We have also added the ability to import from and export to the GIMP palette format (.gpl) to make it easier to share palettes with drawing applications.
Since this workflow tweak is a work in progress please see our known issues section to learn some of the caveats we are currently fixing.
Auto Keyframe Insertion
Pencil2D now comes equipped with three drawing modes for empty frames. You can switch between them in your preferences under timeline. When drawing at a position without a keyframe, you can chose for the program to do one of the following:
- Add a new (blank) keyframe
- Duplicate the previous keyframe
- Keep drawing on the previous keyframe
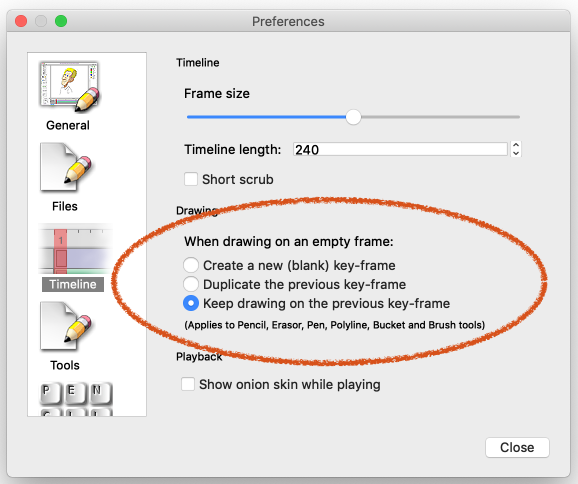
A huge thank you to Martin Van Zijl for implementing this feature!
Import/Export a GIF
This is probably one of the most asked questions: Can I export my animation as a gif? Yes, you sure can. GIF Import/Export has been working since v0.6, but many people had difficulties finding it so we have made this option more visible in both Import/Export menus.

Project Corruption — Saving & Loading Files
We received a series of bug reports (especially for the Windows platform) where users encountered errors while saving (and sometimes loading) a file that prohibited them from opening it again. We paid great attention on this issue and worked hard to make sure you can save and load your work without further inconvenience. We have extensively tested this issue and consider it has been fixed for most foreseeable scenarios. However, we urge all our users to review and follow the Pencil2D file corruption prevention / recovery guide to avoid losing work in the off chance that you still encounter an error.
Note: Most corrupted projects are by definition not recoverable, but there are ways to partially recover certain parts. Read the guide for more info.
Edit the shortcuts
All these shortcuts are editable, so you can customize it your needs.
Here are the shortcuts for the tools:
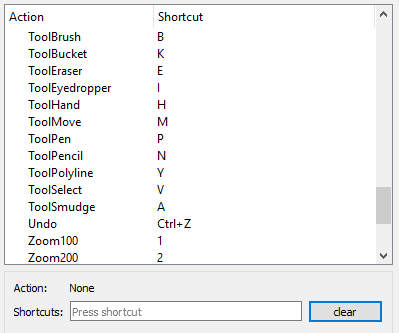
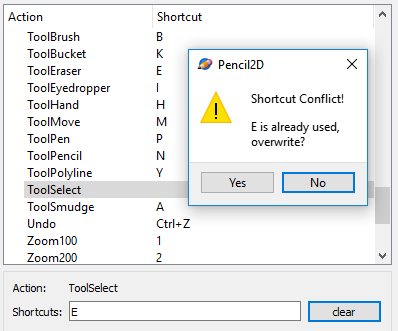
If you want to change the shortcut for the Select tool, which is ‘V’, you can do it directly, by selecting the ToolSelect in the shortcuts window and then placing the cursor in the shortcut text box, and enter the new shortcut, or you can delete it first by pressing ‘Clear’ and then enter the new shortcut in the text box.
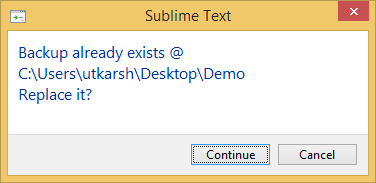
Here we have cleared the shortcut for ToolSelect, and want to enter the new shortcut. We place the cursor in the textbox and press ‘E’. Unfortunately, the ‘E’ is taken by the Eraser tool, so you are given the choice of overwrite the shortcut or cancelling.
ТОП-15 лучших программ для анимации
Программы для создания анимации превращают бездушное изображение или набор картинок в связную историю. Это благотворно сказывается на вовлечении аудитории. Ведь, если честно, мультики любят все, и дети и взрослые. Но чтобы освоить профессиональный софт уровня AfterEffects или Maya, понадобится талант художника и 10 лет обучения.
Не спешите отчаиваться! Мы в этой игре больше 10 лет и точно знаем, чтобы “собрать недорогой короткий ролик”, “анимировать баннер или кнопку”, не обязательно посвящать анимации полжизни. Достаточно выбрать подходящий софт. А может, вы даже откроете в себе талант серьезного моушн-дизайнера?
Итак, несложные коммерческие или личные задачи по анимации решаются с помощью:
| Софт | Русский язык | Лицензия | Стоимость |
| Stop Motion Studio | Нет | Пробная | От 125 руб. |
| Cartoon Animator 4 | Нет | Пробная | От 6300 руб. |
| Moho Anime Studio Debut | Нет | Пробная | От 6300 руб. |
| DigiCel FlipBook | Нет | Пробная | От 1300 руб. |
| Toon Boom Harmony | Да | Пробная | От 2800 руб. |
| Adobe Animate | Да | Пробная | От 1350 руб. |
| Blender | Нет | Бесплатная | Бесплатная |
| Pencil2D | Нет | Бесплатная | Бесплатная |
| Wideo | Нет | Пробная | От 1300 руб. |
| Easy GIF animator | Да | Пробная | От 1800 руб. |
| Synfig Studio | Да | Бесплатная | Бесплатная |
| Animaker | Да | Пробная | От 1300 руб. |
| Explaindio | Да | Пробная | От 2300 руб. |
| Pivot Stickfigure Animator | Да | Бесплатная | Бесплатная |
| CrazyTalk | Да | Пробная | От 3800 руб. |
Обзор
Карандаш документ состоит из слоев. Есть в настоящее время 4 типов слоев: растровые изображения, векторные изображения, звука и камеры. В окне Временная шкала в нижней части экрана показывает, существующих слоев. По умолчанию, новый документ содержит слой растровых и векторных слоев на вершине, но вы можете добавлять и удалять слои, как вы хотите (с помощью или кнопки рядом с надписью «Layers» или в меню Layer).
Имена слоев могут быть изменены, чтобы отражать то, что вы вложили в каждом двойным щелчком мыши по названию слоя на временной шкале. Появится окно, позволяющее изменить имя слоя. Нажмите кнопку ОК, когда вы изменили его имя вы хотите, и новое имя появится в шкале времени.
Каждый слой имеет трек, который позволит вам изменить его в зависимости от времени. Это делается путем вставки кнопки (маленькие серые прямоугольники) на определенных рамок в пути. Каждый раздел содержит информацию о том, что слой должен показать или производить на фрейм, в котором находится ключ. Чтобы добавить или удалить ключи на определенный кадр в слое композицию, используя или кнопки рядом с надписью «Ключи» (сокращение: типа «возвращение», чтобы создать новый кадр). Для слоев изображения (например, растровые и векторные), каждый ключ соответствует другое изображение. Последовательность этих образов создает анимацию. Текущего кадра обозначается красной полосой и может быть изменен путем перемещения красная полоса, чтобы вымыть через анимации (или используйте стрелки влево и вправо). Чтобы воспроизвести анимацию, используя элементы управления в хронологическом порядке
Обратите внимание, что вы можете обходить анимации, а также установить количество кадров в секунду. (Обратите внимание, вы можете петлю и изменить частоту кадров анимации в то время как анимация игры, это большой с точки зрения кадров, чтобы найти лучшие скорость анимации).
Слои
Чтобы выбрать слой, который вы хотите изменить, просто нажмите на него в список слоев (или использовать стрелки вверх и вниз)
Вы можете изменить порядок слоев, перетаскивая их имени. Для влияет на способ слоев изображения отображаются в верхней части друг с другом, это не влияет на звук и камеры слоев. Свойства слоя, например, свое имя, можно изменить, дважды щелкнув по имени (см. выше).
Слои можно активировать или отключить, нажав на кружок в самом слева от значка. Отключить слой образ скрыт от холста зрения.
Если выбранный слой изображения слоя, это показано на холст вид на полную непрозрачность. По умолчанию, других слоев изображения полупрозрачным, чтобы помочь вам сосредоточиться на выбранном слое. Однако, если вы хотите, чтобы все слои изображения в полную непрозрачность (как они будут выглядеть в окончательной визуализации), нажмите круг над всеми слоями, чтобы включить его черным. Если же, напротив, вы хотите сконцентрироваться на выбранный слой, и скрыть все остальные слои, нажмите еще раз круг, чтобы включить его пустым.
Installing Dependencies
There are a few things that must be installed in order to build Pencil2D. In this section we will go over the installation of each of these components in detail. For Ubuntu we describe both graphical and command-line methods of installation, choose whichever one you feel more comfortable with (and if you don’t know the difference, choose graphical). For Arch Linux we describe only the command-line method since that is what most Arch users are used to.
Qt
Pencil2D relies on the Qt application framework so you must install it before you can successfully build the program.
Ubuntu
Graphical method
- Go to the Qt Downloads and download the Qt Online Installer for Linux.
- Executing this file will start the Qt installer application. If you can’t open it right away, you may have to right click on it and go to Properties, then in the Permissions tab select Allow executing file as program and then try opening it again.
- Click Next. It will give you the option to log in with your Qt developer account. You can skip this if you don’t have an account and do not want to register.
- Next specify a location for Qt, put it somewhere you can find it in case you ever need to navigate to the Qt files manually.
- Next you can select the components you wish to install. At the very least you should have Desktop GCC selected under the latest Qt version. Also make sure Qt Creator under the Tools section is being installed (at the time of writing there is no option to uncheck this, but it’s worth double checking!)
- Agree to the license and begin the installation. It will take a long time to download all of the files, so be patient. When the installation is complete, press Done and it will launch Qt Creator for you.
Command-line method
Pencil2D must be built with the Qt 5 framework. To install Qt 5, run this command:
sudo apt install qt5-default qt5-qmake libqt5xmlpatterns5-dev libqt5svg5-dev qtmultimedia5-dev
If you want to install Qt Creator (recommended), then also run the following command:
sudo apt install qtcreator
Arch Linux
Pencil uses version 5 of the Qt framework. To install all required components of Qt, run this command:
sudo pacman -S --needed qt5-multimedia qt5-svg qt5-xmlpatterns
For a more pleasant development experience, you might want to install Qt Creator as well (recommended). To do so, run the following command:
sudo pacman -S --needed qtcreator
Ubuntu
These are usually installed by default, so you don’t have to worry about them. If however you encounter issues, you can run the following commands.
- GNU Make and GCC:
sudo apt install make g++
- GNU Make and Clang:
sudo apt install make clang
Arch Linux
On most Arch systems, these are installed early on, but if your system does not have them yet, you can install them by running the following commands.
- GNU Make and GCC:
sudo pacman -S --needed make gcc
- GNU Make and Clang:
sudo pacman -S --needed make clang
Building the application
Now it’s time to build the application. If you do not already have the Pencil2D source, please go over {Downloading Pencil2D Source} (coming soon) before continuing.
With Qt Creator (recommended)
- Open up the Qt Creator application, and from the menu bar select File and then Open File or Project. Navigate to Pencil2D’s root git folder and open the pencil2d.pro file.
- Next you’ll be asked to configure your kits for the project. Kits determine compilers, target environment, and various build settings among other things. The Desktop option should be the only one checked. Click Configure Project to complete the kit selection.
- Now all you have to do to build is click the plain green arrow in the bottom left corner of the window or press keys. A small progress bar will show up on the bottom right and console output will appear in the bottom section.
- If everything goes well then the version of Pencil2D that you build will open up automatically and you’re done!
If there is an error, the issues tab will open up at the bottom and display the error messages. Try searching it on the Pencil2D Issue tracker or create an issue If you can’t find anything. Be sure to include as much detail as you can in your report!
With QMake/GNU Make
If you do not have or do not want to use Qt Creator for some reason then you can follow this two step process. First you have to use QMake to let Qt do its preprocessing and generate the Makefiles. Cd to the root git directory for Pencil2D. To avoid cluttering the source directories with generated files, we’ll create a subdirectory named build for those. For the next step you will need to know the correct mkspec for your computer. Use the table below to find it.
| Compiler | 32-bit | 64-bit |
|---|---|---|
| GCC | linux-g++-32 | linux-g++-64 |
| Clang | linux-clang | linux-clang |
Substitute <mkspec> for the mkspec of your desired configuration and run the command below:
mkdir build; pushd build; qmake -r -spec <mkspec> CONFIG+=debug ..; popd
Next you have to use GNU Make to actually compile the source code. Run the command:
make -C build
You can then open Pencil2D by running this from the source directory:
./build/bin/pencil2d
Known Issues
- Color Palette (Bitmap): First Swatch is unchangeable. Can’t use replace command. Use the other swatches to create your own colors or change it by editing the palette in a vector layer or via XML.
- Color Palette (Bitmap): Swatches will only update using the Replace command when having a vector layer active. (Note: Create your custom palettes with a vector layer selected)
- Selection Tool: Pressing / / , or changing application focus in your OS while having a selection active will ERASE the selection contents and in some rare instances will crash Pencil2D.
- Selection Tool (Rotation): Using the SELECT ALL command () and rotating a selection, will store the rotation transformation, if you press again and click with the MOVE TOOL on the selection, it will apply the stored value and rotate the selection again. Despite possible use cases this is a bug.
- Undo: Undoing a drawing modification made on an empty frame creates a keyframe on that frame.
- Undo: Undoing moving a keyframe to a new frame will create a blank keyframe on the place where it used to be.
- Undo, Smudge Tool (Bitmap): You cannot UNDO the smudge tool at the moment.
- Blur Tool (Bitmap): Pressing with smudge tool doesn’t work, do not use it. Use other drawing apps for smudge effects.
- Fill Tool (Vector): Filling a stroke requires the stroke to be selected.
- Fill Tool (Vector): “stroke thickness” option will reset pressure sensitive lines width.
Moho (Anime Studio) Pro
Преимущества: его регулярно обновляют с расширенными и новейшими функциями для использования.
Против : не удобно для начинающих, так как функции немного продвинуты.
Anime Studio Pro — фантастический вариант для тех, кто хочет заняться созданием профессиональной 2D-анимации. Он доступен и разработан для анимации в стиле Flash. Хотя вы не можете создавать покадровую анимацию с помощью этой программы, тем не менее вы сможете создать несколько фантастических видеороликов.
Существует Anime Studio Debut — простая анимационная программа, предназначенная для начинающих пользователей и бесплатная загрузка. Но если вам нужны все возможности высококлассного программного обеспечения для 2D-анимации, вам стоит выбрать Pro версию.
Функции:
- Улучшенные инструменты рисования от руки
- Beizer позволяет вам создавать видео так, как вам нужно.
- Функция интеллектуального деформирования помогает создавать собственные сетки для изгибания и скручивания анимации.
- Реалистичное размытие движения
- Анимация для нескольких слоев одновременно
Рекомендации и советы
Графический редактор Pencil2D потребует не слишком много времени на исследование доступных функций.
Частично с адаптацией помогут всплывающие подсказки для новичков и специальное руководство, скрывающееся в разделе «Помощь». А еще облегчат жизнь следующие советы:
- Непрозрачность окна. Если перейти в «Настройки» из раздела «Правка» и в верхней части меню «Общие» подвигать ползунок «Непрозрачность», то интерфейс начнет просвечивать те графические элементы (окна программ или браузера), которые находятся за Pencil2D. Трюк хотя и не новый, но все же редко встречается у конкурентов. А ведь так у художников появляется шанс почти молниеносно срисовать материалы с заранее подготовленного исходника и сэкономить время.
- Точность позиционирования. Редактор поддерживает стилусы и графические планшеты и разрешает в «Настройках» (раздел «Правка») изменять процент сглаживания, и настраивать позиционирование во время рисования на векторном слое.
-
Горячие клавиши. Каждый раз обращаться к интерфейсу мышкой во время рисования или при подготовке анимированных сцен – слишком долго. А потому разработчики и предлагают заполнить раскладку из кнопок, разрешающих мгновенно перейти к нужному действию.
Импорт и экспорт, добавление новых кадров и разворот холста, зеркальное отображение и отмена недавних действий: в «Настройках» подробно перечислены по умолчанию доступные комбинации, а также там предусмотрено возможность добавить собственные.
Onion skin
To help your animation process, you can turn onion skin on or off. Onion skin is the ability to see the previous and/or next keyframes. In the Preferences you can set the number of drawings to show and their transparency.
You can choose to have up to 60 keyframes shown as onion skin, but we recommend that you choose one or two drawings. The transparency is a matter of taste. Values between 15 % and 50 % seems to be a good choice.
In the Display Options dock, you can turn onion skin on and off. Here you can also set the color of the previous drawings to red, and the next drawings to blue. This color coding can be very helpful. Here is how a simple ball-animation looks like with red and blue onion skin.
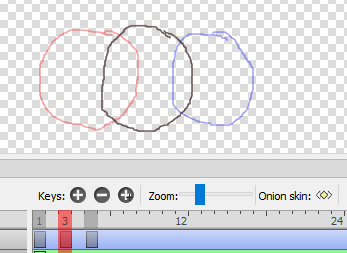
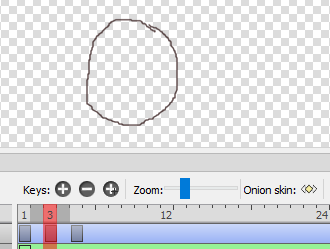
If you press this button on the timeline: the onion skin doesn’t show the previous and next keyframe, but the previous and next frame. In the following illustration you can see that this is no help.
Shortcuts
When you animate, you often need the same tasks done. That could be to change from the Pencil tool to the Eraser tool and back.
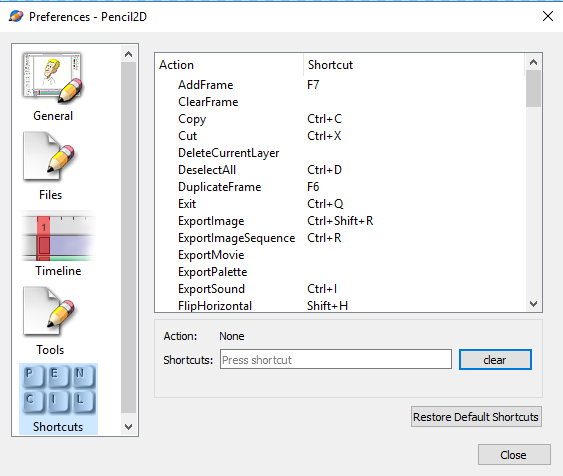
Most of the tasks in Pencil2D have shortcuts, and you can see the shortcuts in the menu or in the Preferences. Let’s look into the Preferences.

Press the Shortcut icon at the bottom, and you’ll see this list.
Timeline Rewrite
Difficulty: Hard
Project Core Objective: Rewrite the timeline for better optimization and extensibility
Description:
The timeline we are currently using is a very old remnant of the Pencil program
from which Pencil2D was forked nearly 6 years ago. Problems with it include its
non-native display, poor speed performance, and it was coded in a way that is
very difficult to add new features to. While few users will notice a significant
difference after these changes, it is very important to us moving forward so
that we continue to provide a responsive program and add many new requested
features which are waiting for the timeline to be more flexible (for example,
layer effects and groups are two important things that would require much less
work to implement with a refactored timeline).
Work on this project has already started. There is a barely-started
abandoned implementation
that was done by scribblemaniac, who will be one of the main mentors should this
project be chosen. He, along with the other developers, will help guide the
design, but it will be up to you to implement the structure and current
features. If you manage to implement all of the features from the old timeline,
you may look into implementing some new timeline/layer features which pique your
interest. A strong background in Qt will be needed for this project.
- Proposal Tag:
- Skills required: C++, Qt, UI design (useful, not strictly necessary)
- Mentor: Connor Deptuck (scribblemaniac)
- Backup Mentor: Matt Chang (chchwy)
Known issues & Gotchas
Here is a non-exhaustive list of bugs that we are already aware of, but were unable to fix in this release. Rest assured, we will do our best to fix all of them eventually.
- #1417 Panels spilling their content or timeline getting pushed outside the scree when the vertical screen size is too narrow, usually on 1366×768 laptops (this was partially addressed by #1369 already)
- #1426 Onion skins, layers & documents show “ghosted” (buffered) images after creating a selection
- #1427 Crash when importing the same layer multiple times with the new Pencil2D project layer import feature
- #1428 Crash when creating new file after using peg-bar alignment
- #1429 Undoing a stroke made in an empty frame, relative to an existing keyframe will create a new keyframe instead and mess up the undo order.
-
#1433 & #1435 Polyline tool drawing not updating properly while drawing on vector & bitmap layers respectively.
- Zooming out the camera layer to less than 25% will increase the chance of Crashing Pencil2D
- #748, #1004, #1098 Misc undo/redo issues. New Undo / Redo system under development will be reviewed for v0.7.0
- #1117 The CLI (Command-Line Interface) export operation consumes more memory than using the editor
- #1120 Undoing Selection Flip X / Y will delete the drawing instead. A possible fix will be available for the new undo system.
- #1133 Lag and buggy strokes with Huion tablets. Workaround: disabling the “linear optimizer” in your tablet driver may help if that option is available, see this post
- #1179 Currently there’s an audio delay of 1-2 frames for in-editor playback & exported files. However on some systems the opposite happens where the audio delay on playback might be longer by 12-16 or more frames, but on export it works ok.
- #1189 Zoom shortcut on drawing tools not working properly with the Middle Mouse Button (Win) and mouse input in general (All Operating Systems)
- #1193 The feather slider widget (Brush Tool) has a higher max value than the input value, and any value above 96 pixels will not allow you to paint.
- #1196 A unerasable stroke appears when drawing if you turn off the pressure sensitivity checkbox with drawing tools.
- #943 Color Palette (Bitmap): Some issues when replacing the first swatch remain. Only thumbnail changes color, but the actual color doesn’t. It is recommended you make a new item rather than changing it.
-
#1055 Color Palette (Bitmap): Swatches will not update using the Replace command. It only works when having a vector layer active. (Note: Create your custom palettes with a vector layer selected or import them from GIMP or Krita using *.gpl files)
- Undo: Undoing moving a keyframe to a new frame will create a blank keyframe on the place where it used to be.
- Undo, Smudge Tool (Bitmap): You cannot UNDO the smudge tool at the moment.
- Blur Tool (Bitmap): Pressing ALT with smudge tool doesn’t work, do NOT use it. Use other drawing apps for smudge or blur effects for now.
- Fill Tool (Vector): Filling a stroke requires the stroke to be selected.
- Fill Tool (Vector): “Stroke thickness” option will reset pressure sensitive lines width.
- Vector Engine is a WIP and does not work as intended. Much more work will be required, please avoid using it for production.
Дизайн и размеры
 Это Apple Pencil 1. С колпачком и Lightning-портом.
Первая версия, полностью оправдывая своё название, в своём минималистичном дизайне похожа на обыкновенный карандаш. Магнитный колпачок, ограниченный металлическим кольцом, издалека напоминает привычную стирательную резинку.
 Это Apple Pencil 2. Никаких колпачков – только магниты.
Корпус второго поколения карандаша получил грань, благодаря которой отдалённо напоминает фирменную ручку Bic. Выглядит интереснее, а главное эргономика Apple Pencil 2 выше, грань удобно фиксирует палец при письме или рисовании.
Кроме того, пластик устройства матовый, оно надёжно лежит в руке и не скользит. У первого поколения он глянцевый, что не добавляет баллов в плане удобства пользования.
Наконец, грань на Apple Pencil 2 позволяет зафиксировать его на ровной горизонтальной поверхности, первое поколение всячески пытается укатиться.

Название у первого карандаша название обозначено на металлическом кольце. У второго поколения надпись выполнена прямо на боковой грани. Больше никаких дополнительных элементов на корпусе. Зато при заказе на американской версии официального сайта можно запросить гравировку своего имени. Причём бесплатно.

Что касаемо размеров, тут ситуация практически не изменилась. Длина карандаша первого поколения – 175,7 мм, второго – 166 мм. Диаметр устройств одинаковый – 8,9 мм.
