Установка phpmyadmin
Содержание:
Причины популярности PhpMyAdmin
Простота пользования и удобство интерфейса PHPMyAdmin предопределили его популярность и широту распространения во Всемирной сети. Эту программу включают в пакет серверного софта большинство хостеров, предоставляющих виртуальные площадки для размещения сайтов. Кроме того, она является частью пакета программ локальных серверов, используемых веб-разработчиками для отладки сайтов на домашних компьютерах. Например, она входит в состав популярных пакетов серверных программ Denwer и Apache.
Скрипт бесплатен, у него открытый код. Скачать его можно на многих ресурсах, но лучше это сделать на официальном сайте: http://www.phpmyadmin.net/.
iPipe – надёжный хостинг-провайдер с опытом работы более 15 лет.
Мы предлагаем:
- Виртуальные серверы с NVMe SSD дисками от 299 руб/мес
- Безлимитный хостинг на SSD дисках от 142 руб/мес
- Выделенные серверы в наличии и под заказ
- Регистрацию доменов в более 350 зонах
About
phpMyAdmin is a free software tool written in PHP,
intended to handle the administration of MySQL
over the Web. phpMyAdmin supports a wide range of operations on MySQL and
MariaDB. Frequently used operations (managing databases, tables,
columns, relations, indexes, users, permissions, etc) can be performed via the
user interface, while you still have the ability to directly execute any SQL statement.
phpMyAdmin comes with a wide range of documentation and users are welcome to
update our wiki pages to share ideas and
howtos for various operations. The phpMyAdmin team will try to help you if
you face any problem; you can use a variety of support channels to get
help.
phpMyAdmin is also very deeply documented in a book written by one of the developers
– Mastering phpMyAdmin for
Effective MySQL Management, which is available in English and .
To ease usage to a wide range of people, phpMyAdmin is being translated into 72 languages and supports both LTR
and RTL languages.
phpMyAdmin is a mature project with a stable and flexible code
base; you can find out more about the project and its history and the awards it earned. When the project turned 15, we published a celebration page.
The phpMyAdmin project is a member of Software Freedom Conservancy. SFC is a not-for-profit organization that helps promote, improve, develop, and defend Free, Libre, and Open Source Software (FLOSS) projects.

Features
- Intuitive web interface
- Support for most MySQL features:
- browse and drop databases, tables, views, fields and indexes
- create, copy, drop, rename and alter databases, tables, fields and
indexes - maintenance server, databases and tables, with proposals on server
configuration - execute, edit and bookmark any
SQL-statement, even
batch-queries - manage MySQL user accounts and privileges
- manage stored procedures and triggers
- Import data from
CSV and
SQL - Export data to various formats:
CSV,
SQL,
XML,
PDF,
ISO/IEC 26300 —
OpenDocument Text and Spreadsheet,
Word,
LATEX
and others - Administering multiple servers
- Creating graphics of your database layout in various formats
- Creating complex queries using Query-by-example (QBE)
- Searching globally in a database or a subset of it
- Transforming stored data into any format using a set of predefined
functions, like displaying BLOB-data as image or download-link - And much more…
Latest News
- 2021-02-24: phpMyAdmin 5.1.0 is released
- 2020-10-15: phpMyAdmin 4.9.7 and 5.0.4 are released
- 2020-10-10: phpMyAdmin 4.9.6 and 5.0.3 are released
- 2020-03-21: phpMyAdmin 4.9.5 and 5.0.2 are released
- 2020-01-08: phpMyAdmin 4.9.4 and 5.0.1 are released
phpMyAdmin 5.0.0 is released
2019-12-26
Welcome to the release of phpMyAdmin version 5.0.0. This release is occurring simultaneously with version 4.9.3; except for users with old PHP installations, version 5.0.0 is the recommended version.
This release includes many new features and improvements from the 4.9 series. We expect to maintain version 4 in a security capacity
to support users with older PHP installations. For full details about supported versions and end of life dates, see the «Supported versions»
grid at https://www.phpmyadmin.net/downloads/.
With this release, we are removing support of old PHP versions (5.5, 5.6, 7.0, and HHVM). These versions are outdated and are no longer supported by the PHP team.
Version 5.0 includes many coding improvements that modernize the interface. Many of these changes are transparent to users, but make the code easier to maintain.
Much of this refactoring work is completed by our contract developer, Maurício Meneghini Fauth. We always consider applications for new (paid) contract developers,
see https://www.phpmyadmin.net/contractor/ for program details.
Some of the changes and new features include:
- Enable columns names by default for CSV exports
- Add Metro theme
- Automatically add the index when creating an auto increment column
- Improvements to exporting views
- Prompt the user for confirmation before running an UPDATE query with no WHERE clause
- Improvements to how errors are show to the user (including allowing easier copying of the error text to the clipboard)
- Added keystrokes to clear the line (ctrl+l) and clear the entire console window (ctrl+u)
- Use charset ‘windows-1252’ when export format is MS Excel
There are several more changes, please refer to the ChangeLog file included with the release for full details.
Known shortcomings:
Due to changes in the MySQL authentication method, PHP versions prior to 7.4 are unable to authenticate to a MySQL 8.0 or newer server (our tests show the problem actually began with MySQL 8.0.11). This relates to a PHP bug https://bugs.php.net/bug.php?id=76243. There is a workaround, that is to set your user account to use the current-style password hash method, mysql_native_password. This unfortunate lack of coordination has caused the incompatibility to affect all PHP applications, not just phpMyAdmin. For more details, you can see our bug tracker item at https://github.com/phpmyadmin/phpmyadmin/issues/14220. We suggest upgrading your PHP installation to take advantage of the authentication methods.
Downloads are available now at https://phpmyadmin.net/downloads/
Our work would not be possible without the donations of our generous sponsor, and this release in particular is brought to you thanks to the hard work of our Google Summer of Code students and many other contributors.
База данных MySQL: что это такое и в чем ее преимущества
MySQL – это реляционная система управления базами данных с открытым исходным кодом, написанная на языках программирования C и C++. Благодаря ей можно оптимизировать работу сайта или мобильного/десктопного приложения.
База данных – это место для структурированного хранения данных. Например, чтобы найти в смартфоне сохраненную картинку, мы используем для этого галерею. В данном случае картинки – это данные, а галерея – база данных.
Такой же подход используется и на многих сайтах, где подключены формы регистрации, системы оформления заказа и прочее. Когда вы регистрируетесь на сервисе, вся полученная от вас информация сохраняется в базе данных – благодаря этому вы можете повторно войти в свой аккаунт и получить доступ к внесенным ранее изменениям.
Если вести крупный ресурс без БД, то на это будет уходить очень много времени и средств. Базы данных группируют и упорядочивают информацию, упрощают получение доступа к ней. Чтобы администрировать такой большой поток данных, используются СУБД: MySQL, Microsoft SQL Server, PostgreSQL и другие.
MySQL хранит всю информацию в табличном виде. Извлечь данные из одной или нескольких таблиц можно с помощью запроса. Запросы в MySQL – это то, на чем все строится, с их помощью можно выполнять всевозможные операции с данным.
Столбцы таблицы всегда строго упорядочены, а расположение строк при необходимости может меняться в зависимости от информации в ячейках. Посмотрите на простую адресную книжку в виде таблицы:
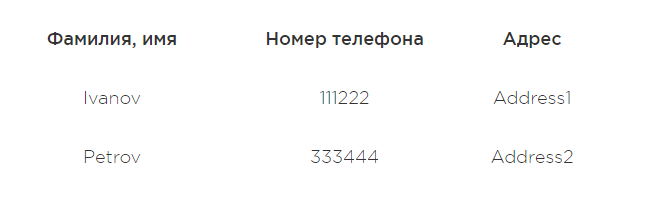
Принцип работы с таблицами следующий: к серверу, на котором хранятся и обрабатываются структурированные данные, подключаются клиенты для получения необходимой информации, а для взаимодействия между пользователем и сервером используется специальное ПО. Заполнение подобных и более крупных таблиц происходит с помощью языка программирования SQL.
Исходя из пользовательского опыта, можно выделить следующие особенности MySQL:
- быстрая скорость доступа и обработки данных;
- надежная защита информации;
- простота использования;
- совместимость с Windows и Linux;
- бесплатность;
- возможность контролировать доступ к данным и учетным записям;
- шифрование паролей.
На этом с теоретической частью закончим.
Соединение через SSH туннель
Данный тип подключения считается более безопасным, потому что все данные по SSH-туннелю передаются в зашифрованном виде, исключая возможность перехвата.
Подключение в Windows
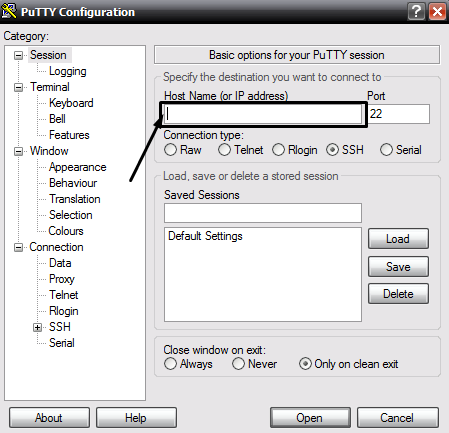
В данной ОС соединение по SSH протоколу можно осуществить с помощью специальных программ для управления базами данных. Например, PuTTY (бесплатная программа) или SecureCRT (платное ПО, но с пробной версией на 30 дней).
Мы для работы выбрали PuTTY. Скачиваем установщик с официального сайта и устанавливаем приложение. Запускаем программу, затем переходим в раздел «Session». В поле «Host Name» вводим свой домен или указываем его IP-адрес.
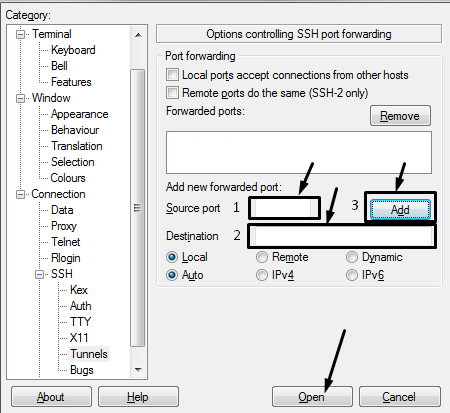
Далее переходим в категорию «Connection», открываем вкладку «SSH», затем «Tunnels». В поле «Source Port» указываем значение 3306, в «Destination» вбиваем localhost:3306, потом жмем на кнопку «Add» для добавления порта в список. И только потом жмем кнопку «Open» для установления соединения с хостом.
Логин и пароль те же самые, которые используются для входа в панель управления. При подключении используем имя пользователя и пароль, выданные при создании базы данных. Адрес сервера — 127.0.0.1, порт для подключения 3306.
Предупреждаем, что если вы уже устанавливали сервер баз данных MySQL на своем компьютере, то соединение через порт 3306 будет недоступно. Надо будет указать другое значение, например 3307.
Подключение в Linux
В ОС Linux никакого дополнительного ПО устанавливать не придется, можно все провести через командную строку «Терминал». Перед тем как подключиться к MySQL удаленно, нужно создать SSH-туннель. Вводим вот такую команду:
ssh -L3306:localhost:3306 -n логин@site.com
Потом в конфигурационном файле MySQL потребуется изменить параметр, отвечающий за удаленное подключение. Открываем в «Терминале» файл, дав вот такую команду:
sudo nano /etc/mysql/my.cnf
Далее комментируем нужную нам строку. В итоге она должна выглядеть вот таким образом:
# bind-address = 127.0.0.1
Сохраняем изменения, потом перезапускаем MySQL вот такой командой:
sudo service mysql restart
Далее будет запрошен пароль для входа в панель управления хостингом, вводим его. Для подключения к удаленному серверу MySQL необходимо создать пользователя, и делается это вот такой командой:
GRANT ALL ON *.* TO имя_пользователя@127.0.0.1 IDENTIFIED BY 'пароль'
Так мы создадим пользователя с неограниченным доступом ко всем базам на указанном сервере. Потом проверяем подключение утилитой telnet. Если сервер запрос не отклонил, значит, пора приступать к подключению. Для этого можно задать команды вот таких типов:
mysql -u имя_пользователя –h 127.0.0.1 –p

mysql -h наименование_хоста -u dbUser -p dbName
Как проверить соединение с базой данных MySQL
Для проверки подключения к базе данных MySQL во всех ОС используем утилиту telnet. Нужно просто открыть командную строку и набрать в ней вот такую команду:
telnet 127.0.0.1 3306
Если соединение установится, то настройка туннеля прошла успешно, можно приступать к подключению. Если нет, рекомендуем тщательно проверить все настройки.
phpMyAdmin 4.8.0
Released 2018-04-07.
Welcome to phpMyAdmin version 4.8.0. We are excited to bring you this updated version with many new features and bug fixes. There are no changes to system requirements.

A complete list of new features and bugs that have been fixed is available in the ChangeLog file or changelog.php included with this release.

Major changes include security enhancements such as removing the PHP eval() function and authentication logging, a mobile interface to improve the interface when used with tablets or mobile phones, and two-factor authentication options.

A few highlights of the changes include:

* Allow the removal of individual segments from pie charts
* Improved database search to allow matching the exact phrase
* phpMyAdmin no longer requires using the PHP eval() function
* The mbstring dependency is now optional
* Authentication logging using $cfg
* Add support for Google's Invisible Captcha
* Improved handling of reCAPTCHA
* Fixes to the JavaScript editor for TIME values
* Improved the editor for the JSON data type
* Add "Format" button to the edit view form
* Implement mobile interface
* There are now configuration directives to set defaults for Transformation options
* Allow Designer to show tables from other databases
* Add support for authentication using U2F and 2FA
* Designer: fix broken "Add tables from other database"
* Fix double escaping of ENUM dropdown
* Restore SQL query after session expires
* Query builder: Fix for new column not being added
* Fix for blank login page
* Changes to the handling of arg_separator for AJAX requests; see issue #13940
* Structure tab: fix silent failure to create new indexes
* Fix improperly escaped HTML code on the database structure page
* Fix JavaScript errors when using Internet Explorer (in particular when editing rows)
* Fix for broken error report
* Fix failed import
* Fix for "Cannot read property sql_query of undefined" errors

Much of this work is thanks to the hard work of our Google Summer of Code 2017 students.

Additionally, there have been continuous improvements to many of the translations. If you don't see your language or find a problem, you can contribute too; see  for details.

As always, downloads are available at https://www.phpmyadmin.net

Thanks to our sponsors for helping to make this work possible!

The phpMyAdmin Team
Older version compatible with PHP 5.5 to 7.2 and MySQL/MariaDB 5.5 and newer. Was supported until June 4, 2019.
| File | Size | Verification |
|---|---|---|
| phpMyAdmin-4.8.0-all-languages.zip | 10.1 MB | |
| phpMyAdmin-4.8.0-all-languages.tar.gz | 9.1 MB | |
| phpMyAdmin-4.8.0-all-languages.tar.xz | 5.6 MB | |
| phpMyAdmin-4.8.0-english.tar.gz | 5.0 MB | |
| phpMyAdmin-4.8.0-english.tar.xz | 3.8 MB | |
| phpMyAdmin-4.8.0-english.zip | 6.1 MB | |
| phpMyAdmin-4.8.0-source.tar.xz | 11.2 MB |
Since July 2015 all phpMyAdmin releases are cryptographically signed by the
releasing developer. You should verify that the signature matches the archive
you have downloaded. Verification instructions are placed in our
documentation in the chapter.
Правила устройства БД в PhpMyAdmin на локальном сервере
- Каждый столбец имеет уникальное имя;
- Все столбцы должны располагаться в определенном порядке, который задается в момент создания БД;
- В базе данных должен быть обязательно хоть один столбец. Строк может не быть;
- Каждая строка не может повторяться;
Смотреть:
Данные вставляемые в столбец, имеют уникальный ТИП_ДАННЫХ.
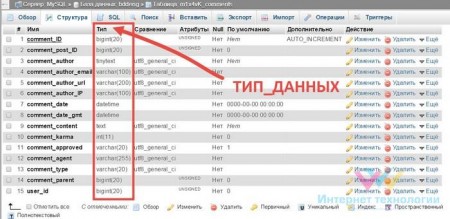
Наиболее распространённые следующие типы данных:
- «DECIMAL» — Десятичные числа;
- «CHAR» — Краткий текст длинной до 255 символов;
- «INT» – Числа целые;
- «LONGTEXT» – Текст до 4,294,967,295 символов;
- «TEXT» – Текст обычный до 65,535 символов;
- «Date» – Даты, формат ГГГГ-ММ-ДД;
- «DATETIME» – дата и время ГГГГ-ММ-ДД ЧЧ: ММ: СС;
- «VARCHAR» – любые символы;
- «Time» – время — формат ЧЧ:MM:СС.
Язык базы данных в PhpMyAdmin на локальном сервере
Главный язык реляционных баз данных язык SQL. На нем пишутся запросы к базе данных. Называются запросы — SQL запрос. Для отправления SQL запросов в phpMyAdmin есть вклада: SQL, в верхнем горизонтальном меню.
Это все, про phpMyAdmin на локальном сервере. В следующей статье, я подробно расскажу, как работать с базой данных в phpMyAdmin.
WebOnTo.ru
Ubuntu
Инсталляция phpMyAdmin в Ubuntu:
aptitude install phpmyadmin
Безопасность phpMyAdmin:
-
Для увеличения безопасности доступа к phpmyadmin можно разрешить доступ с определенных IP, отредактировав файл /etc/apache2/conf-enabled/phpmyadmin.conf
Alias /phpmyadmin /usr/share/phpmyadmin <Directory /usr/share/phpmyadmin> Deny from all Allow from 127.0.0.0/255.0.0.0 ::1/128 Allow from xxx.xxx.xxx.xx ... - Можно разрешить доступ к phpmyadmin только при помощи .
-
Можно удалить phpmyadmin.conf в conf-enabled и подгружать его только для определенного виртуального хоста, при помощи директивы IncludeOptional или Include в зависимости от версии Apache
<VirtualHost _default_:443>

     Include etcphpmyadminapache.conf
#    IncludeOptional conf-available/phpmyadmin.conf
</VirtualHost>
Поддержка Пользователей
Документация включена в дистрибутив в виде текстового, а также файла в формате HTML, кроме того можно ознакомиться с документацией в разделе «Документация» (перевод оригинальной документации на русский язык) или на оф. сайте www.phpmyadmin.net (англ. ориг. вариант).
Данное ПО предусмотрено без каких бы то ни было конкретных или предполагаемых гарантий, но существует возможность отправить сообщение разработчикам с помощью баг трекера о найденном баге для последующего его исправления.
Кроме того, на SourceForge.net существует конференция, посвященная phpMyAdmin.
Ну и наконец, поддержка пользователей осуществляется на форуме поддержки.
Using SSL for connection to database server
It is recommended to use SSL when connecting to remote database server. There
are several configuration options involved in the SSL setup:
- Defines whether to use SSL at all. If you enable only this, the connection
will be encrypted, but there is not authentication of the connection — you
can not verify that you are talking to the right server. - and
- This is used for authentication of client to the server.
- and
- The certificate authorities you trust for server certificates.
This is used to ensure that you are talking to a trusted server. - This configuration disables server certificate verification. Use with
caution.
When the database server is using a local connection or private network and SSL can not be configured
you can use to explicitly list the hostnames that are considered secure.
Contribute to phpMyAdmin
As a free software project, phpMyAdmin is very open to your contributions. You don’t
need developer skills to help, there are several non-coding ways to get involved
in a project (code is welcome too, of course!).
You may also decide to apply for a contract developer position with the project.
An invitation to students
To gain practical experience in open-source development, you are welcome to contribute to phpMyAdmin. Usually, this is volunteer work, but since 2008, our project has been part of Google Summer of Code. This program «offers post-secondary student developers ages 18 and older stipends to write code for various open source software projects». So, join us soon and get ready for the next GSoC!
Localization
phpMyAdmin is being translated to many languages, but maybe your language is not
really up to date? You can easily contribute on our
translation server.
You can find out more on the translation
page.
Testing and quality assurance
One important thing for us is to avoid problems in the user interface. You can really help
us here by providing feedback on releases and especially by testing the pre-releases
(alpha/beta/rc) we provide for testing. Just download them and report any issues
you face with them.
Documentation writer/tutorial creator
Do you
feel our documentation misses some points? We welcome additions; just
let us know how you think the documentation can be improved.
The best way is to submit a pull request
against our GitHub repository.
If you don’t know how to make these changes, we still want to hear your input.
You can submit a feature request
explaining your suggested improvements.
Also documentation does not have to be text only, we would welcome to have some
video tutorials giving users hints how to do specific tasks inside phpMyAdmin.
Developing
Coding contributions are very welcome, the easiest way is to fork our code on github
and submit a pull request. We really welcome bug fixes or new features.
You can find out more on the developers
page.
Bug/features screening/squashing
Our trackers, especially the
feature tracker,
contain dozens of entries which might already be implemented or don’t make much sense after years.
You can go through reported issues, verify if they still apply to latest version and
check whether they would be still useful. Also checking incoming reports for all required
information or whether they were already reported is welcome help.
Fund our project
We need money to allow our presence at conferences, buy new hardware or provide various
useful services to our users and developers. By donating
you help us in this area and possibly increase our presence at conferences.
We also use donated funds to hire contract developers who
are paid directly to work on bug fixing, new features, and other phpMyAdmin improvements.
Создание нового пользователя в MySQL
После установки MySQL в базе данных автоматически будет создан новый пользователь root. Работать под таким именем небезопасно, поэтому рекомендуется создавать нового пользователя и выполнять необходимые действия под ним. Давайте рассмотрим два способа создания нового пользователя в MySQL – через phpMyAdmin и через консоль.
Вариант 1: с помощью phpMyAdmin
Нам потребуется phpMyAdmin – приложение для работы с базой данных, которое обычно по умолчанию предустановлено на хостинге либо локальном сервере.
Чтобы добавить нового пользователя в phpMyAdmin, воспользуемся инструкцией:
- На главной странице через верхнее правое меню переходим во вкладку «Учетные записи пользователей». Затем выбираем «Добавить учетную запись пользователя».
- Следующим шагом вводим новое имя пользователя и хоста, прописываем пароль. В завершение жмем на кнопку «Генерировать».
- Теперь нам потребуется задать привилегии для нового пользователя. Если вы хотите установить доступ только для определенных баз данных, то можете пропустить этот пункт – просто нажмите на кнопку «Вперед», расположенную внизу страницы.
- Будет добавлен новый пользователь с указанным именем.
Подробнее о правах доступа мы поговорим чуть позже, а пока давайте рассмотрим альтернативный метод добавления пользователя в БД.
Вариант 2: через консоль
Если вы подключаетесь к серверу по SSH, то этот способ для вас. Нам потребуется выполнить несколько команд:
Первым дело активируем сервер базы данных:
mysql
Создадим нового пользователя:
CREATE USER 'user'@'localhost' IDENTIFIED BY 'pswrd';
В кавычках потребуется изменить следующие данные: user – имя пользователя, pswrd – пароль.
Пока что пользователь не имеет разрешений, а значит, не может получить доступ к MySQL. Для решения такой проблемы пропишем еще одну строчку кода:
GRANT ALL PRIVILEGES ON * . * TO 'user'@'localhost';
Мы выдали указанному пользователю все доступные права. Осталось сохранить внесенные изменения с помощью команды:
FLUSH PRIVILEGES;
Готово! Теперь вы знаете, как создать нового пользователя в MySQL с правами доступа root.
Возможные проблемы
1. Ошибка при обработке запроса, код 200, parsererror (rejected)
Появляется во всплывающем окне сразу после входа в базу. Дополнительно сообщение: «Похоже соединение с сервером потеряно. Проверьте сетевое подключение и статус сервера.»
Причина: предыдущие сессии могут храниться на сервере. Когда мы подключаемся к базе, к которой ранее подключались со старого phpMyAdmin, приложение безуспешно пытается их использовать.
Решение: просто обновляем в браузере страницу и заходим в базу повторно.
2. Секретная парольная фраза в конфигурации (blowfish_secret) слишком короткая
Предупреждение может появиться снизу на страницах приложения.
Причина: в более новых версиях может потребоваться использовать более стойкую парольную фразу. Она задается в конфигурационном файле, который мы перенесли со старой версии.
Решение: меняем парольную фразу. Сначала генерируем ее командой:
head /dev/urandom | tr -dc A-Za-z0-9 | head -c 32 ; echo »
После открываем конфигурационный файл:
vi /var/www/phpMyAdmin/config.inc.php
И редактируем строку:
$cfg = ‘NiYR7z886zou9C50UczXL7zRp2Pg5sRC’;
phpMyAdmin 4.9.3 is released
2019-12-26
Welcome to phpMyAdmin 4.9.3, a routine bugfix release. This release is occurring simultaneously with the release of phpMyAdmin 5.0.0, which is our recommended version except for users with older PHP installations.
This is planned as the final bugfix release of phpMyAdmin version 4. Version 4 works with PHP versions 5.5 through (at least) 7.4,
and MySQL versions 5.5 and newer (and the corresponding MariaDB versions). Version 5 will require PHP 7.1 or newer, but
we plan to maintain security fixes for version 4 as part of our LTS program. For end of life details and supported
versions, please see the «Supported versions» grid at https://www.phpmyadmin.net/downloads/.
This release includes fixes for many bugs, including:
- Several PHP notices and warnings including «Undefined index table_create_time,»
a notice about error_reporting() being disabled for security reasons, and several Undefined Index errors. - Support CloudFront-Forwarded-Proto header for Amazon CloudFront proxy
- Early compatibility with development versions of PHP 8
- Fix replication actions (start, stop, etc)
There are many, many more bug fixes thanks to the efforts of our developers and other contributors.
For full details, you can see the ChangeLog file included with this release.
August 13, 2019
GSoC PMA: Week-9
One of the problem I was facing last week has finally been resolved. In one of the issue, “Designer Save as enhancement”, earlier the changes were happening as expected but the problem was that it works only when we have a alert message. It doesn’t work without alert message(in last week, I wasn’t able to figure out why). Later on looking into the things, I figured out that there was a problem of synchronization here. To resolve this, I searched for a while and later on found .ajaxStop(). AjaxStop(): Register a handler to be called when all Ajax requests have completed. “Whenever an Ajax request completes, jQuery checks whether there are any other outstanding Ajax requests. If none remain, jQuery triggers the ajaxStop event. Any and all handlers that have been registered with the .ajaxStop() method are executed at this time. The ajaxStop event is also triggered if the last outstanding Ajax request is cancelled by returning false within the beforeSend callback function”(Source: https://api.jquery.com/ajaxStop/). Finally I created a PR to resolve the issue correctly.
Another problem which I was facing was with the issue “Designer should remember expanded/collapsed state”, here I don’t know exactly why I am not able to restore the states. Here the GET and SET values are correct and also I loaded the data into the appropriate variables correctly too, not sure where is the problem exactly. Still trying to figure it out.
Beside these 2 issues, I started working towards other 2 issues:- “Designer should show tables from other databases by default”- “Designer page save fails if dB name contains period .”
Regarding the issue, “Designer page save fails if dB name contains period .”, I remember that I was able to reproduce this while preparing the GSoC proposal but now I am not able to reproduce this. I have commented the same on the issue too. Let’s hope we figure this out as soon as possible.
Regarding the other issue “Designer should show tables from other databases by default”, I have looked at the discussions and code related to this(actually the discussion which lead to this issue) also, I am able to reproduce this one but not able to track this down(the point where we need to make the appropriate changes to resolve this).
In the upcoming week, I have to resolve these issues and discuss things with mentors if I face any problems. Also, I need to look at the refactoring work if I need to make any changes over there or not. I need to speed up the things as the deadline for the final evaluation is approaching and the work should be finished with complete documentation before that. Let’s hope I finish things on time.
phpMyAdmin 4.9.0.1
Released 2019-06-04.
Welcome to phpMyAdmin 4.9.0.1, a bugfix release that includes important security fixes.

This release fixes two security vulnerabilities:

* PMASA-2019-3 is an SQL injection flaw in the Designer feature
* PMASA-2019-4 is a CSRF attack that's possible through the 'cookie' login form

Upgrading is highly recommended for all users. Using the 'http' auth_type instead of 'cookie' can mitigate the CSRF attack.

The solution for the CSRF attack does remove the former functionality to log in directly through URL parameters (as mentioned in FAQ 4.8, such as https://example.com/phpmyadmin/?pma_username=root&password=foo). Such behavior was discouraged and is now removed. Other query parameters work as expected; only pma_username and pma_password have been removed.

This release also includes fixes for many bugs, including:

- Several issues with SYSTEM VERSIONING tables
- Fixed json encode error in export
- Fixed JavaScript events not activating on input (sql bookmark issue)
- Show Designer combo boxes when adding a constraint
- Fix edit view
- Fixed invalid default value for bit field
- Fix several errors relating to GIS data types
- Fixed javascript error PMA_messages is not defined
- Fixed import XML data with leading zeros
- Fixed php notice, added support for 'DELETE HISTORY' table privilege (MariaDB >= 10.3.4)
- Fixed MySQL 8.0.0 issues with GIS display
- Fixed "Server charset" in "Database server" tab showing wrong information
- Fixed can not copy user on Percona Server 5.7
- Updated sql-parser to version 4.3.2, which fixes several parsing and linting problems

There are many, many more bug fixes thanks to the efforts of our developers, Google Summer of Code applicants, and other contributors.

The phpMyAdmin team
Older version compatible with PHP 5.5 to 7.4 and MySQL/MariaDB 5.5 and newer. Currently supported for security fixes only.
| File | Size | Verification |
|---|---|---|
| phpMyAdmin-4.9.0.1-all-languages.zip | 10.5 MB | |
| phpMyAdmin-4.9.0.1-all-languages.tar.gz | 9.6 MB | |
| phpMyAdmin-4.9.0.1-all-languages.tar.xz | 5.8 MB | |
| phpMyAdmin-4.9.0.1-english.tar.gz | 5.0 MB | |
| phpMyAdmin-4.9.0.1-english.tar.xz | 3.9 MB | |
| phpMyAdmin-4.9.0.1-english.zip | 6.1 MB | |
| phpMyAdmin-4.9.0.1-source.tar.xz | 11.4 MB |
Since July 2015 all phpMyAdmin releases are cryptographically signed by the
releasing developer. You should verify that the signature matches the archive
you have downloaded. Verification instructions are placed in our
documentation in the chapter.
Шаг 1 — Установка phpMyAdmin
Вы можете использовать APT для установки phpMyAdmin из репозиториев Ubuntu по умолчанию.
Обновите индекс пакетов вашего сервера от имени пользователя без прав root с привилегиями sudo:
После этого вы можете установить пакет . Помимо этого пакета, официальная документация также рекомендует установить несколько расширений PHP на ваш сервер для возможности использования определенной функциональности и улучшения производительности.
Если вы выполнили предварительное требования руководства для стека LAMP, ряд из этих модулей уже был установлен вместе с пакетом . Однако рекомендуется также установить следующие пакеты:
- : модуль для работы с строками, не поддерживающими кодировку ASCII, и конвертации таких строк в другие кодировки
- : это расширение поддерживает загрузку файлов в phpMyAdmin
- : поддержка библиотеки GD Graphics
- : поддержка сериализации JSON для PHP
- : позволяет PHP взаимодействовать с разными типами серверов, используя разные протоколы
Запустите следующую команду для установки этих пакетов в систему
Обратите внимание, что процесс установки требует, чтобы вы ответили на ряд вопросов для корректной настройки phpMyAdmin. Мы кратко пробежимся по этим параметрам:
Здесь представлены параметры, которые вы должны выбрать при запросе для корректной настройки вашей установки:
-
Для выбора сервера вы можете выбрать
Предупреждение. При появлении запроса вариант «apache2» выделен, но не выбран. Если вы не нажмете для выбора Apache, установщик не будет перемещать необходимые файлы при установке. Нажмите , затем , а потом для выбора Apache. - Выберите при ответе на вопрос о том, необходимо ли использовать для настройки базы данных.
- Затем вам будет предложено выбрать и подтвердить пароль приложения MySQL для phpMyAdmin
Примечание. Если вы установили MySQL, следуя указаниям , вы, возможно, активировали плагин Validate Password. На момент написания этого руководства активация этого компонента будет вызывать ошибку при попытке задать пароль пользователя phpmyadmin:
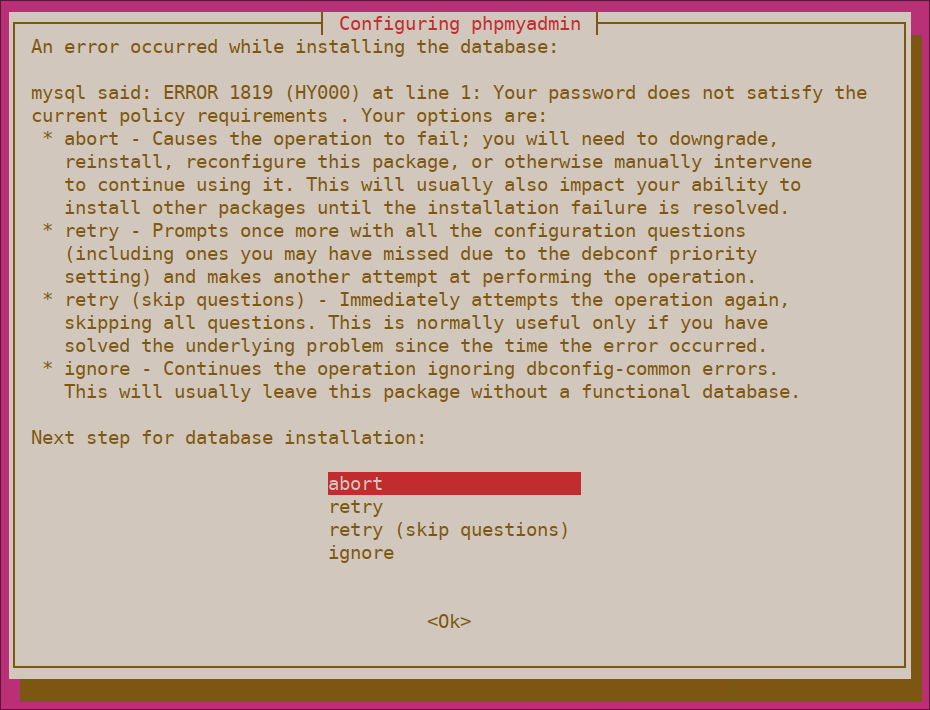
Для устранения этой проблемы выберите опцию abort для остановки процесса установки. Затем откройте командную строку MySQL:
Либо, если вы активировали аутентификацию по паролю для пользователя с правами root MySQL, запустите эту команду, а затем введите пароль при запросе:
Из командной строки запустите следующую команду для отключения компонента Validate Password
Обратите внимание, что в этом случае выполняется не удаление, а простая остановка загрузки компонента на ваш сервер MySQL:. После этого вы можете закрыть клиент MySQL:
После этого вы можете закрыть клиент MySQL:
Затем попробуйте еще раз установить пакет , после чего все будет работать ожидаемым образом:
После установки phpMyAdmin вы можете открыть командную строку MySQL еще раз с помощью или , а затем запустить следующую команду для повторной активации компонента Validate Password:
В процессе установки будет добавлен файл конфигурации phpMyAdmin в каталог , где он будет считываться автоматически. Для завершения настройки Apache и PHP для работы с phpMyAdmin выполните последнюю оставшуюся задачу этого раздела руководства и явно активируйте расширение PHP с помощью следующей команды:
Перезапустите Apache для вступления изменений в силу.
Теперь phpMyAdmin установлен и настроен для работы с Apache. Однако, прежде чем вы сможете войти и начать взаимодействие с базами данных MySQL, вам нужно убедиться, что у пользователей MySQL есть права, необходимые для взаимодействия с программой.