Использование модуля requests в python
Содержание:
Make a Request
Making a request with Requests is very simple.
Begin by importing the Requests module:
>>> import requests
Now, let’s try to get a webpage. For this example, let’s get GitHub’s public
timeline:
>>> r = requests.get('https://api.github.com/events')
Now, we have a object called . We can
get all the information we need from this object.
Requests’ simple API means that all forms of HTTP request are as obvious. For
example, this is how you make an HTTP POST request:
>>> r = requests.post('https://httpbin.org/post', data = {'key''value'})
Nice, right? What about the other HTTP request types: PUT, DELETE, HEAD and
OPTIONS? These are all just as simple:
>>> r = requests.put('https://httpbin.org/put', data = {'key''value'})
>>> r = requests.delete('https://httpbin.org/delete')
>>> r = requests.head('https://httpbin.org/get')
>>> r = requests.options('https://httpbin.org/get')
Lower-Level Classes
- class (method=None, url=None, headers=None, files=None, data=None, params=None, auth=None, cookies=None, hooks=None, json=None)
-
A user-created object.
Used to prepare a , which is sent to the server.
Parameters: - method – HTTP method to use.
- url – URL to send.
- headers – dictionary of headers to send.
- files – dictionary of {filename: fileobject} files to multipart upload.
-
data – the body to attach to the request. If a dictionary or
list of tuples is provided, form-encoding will
take place. - json – json for the body to attach to the request (if files or data is not specified).
-
params – URL parameters to append to the URL. If a dictionary or
list of tuples is provided, form-encoding will
take place. - auth – Auth handler or (user, pass) tuple.
- cookies – dictionary or CookieJar of cookies to attach to this request.
- hooks – dictionary of callback hooks, for internal usage.
Usage:
>>> import requests >>> req = requests.Request('GET', 'https://httpbin.org/get') >>> req.prepare() <PreparedRequest >- (event, hook)
-
Deregister a previously registered hook.
Returns True if the hook existed, False if not.
- ()
-
Constructs a for transmission and returns it.
- (event, hook)
-
Properly register a hook.
Migrating to 2.x
Compared with the 1.0 release, there were relatively few backwards
incompatible changes, but there are still a few issues to be aware of with
this major release.
For more details on the changes in this release including new APIs, links
to the relevant GitHub issues and some of the bug fixes, read Cory’s blog
on the subject.
API Changes
-
There were a couple changes to how Requests handles exceptions.
is now a subclass of rather than
as that more accurately categorizes the type of error.
In addition, an invalid URL escape sequence now raises a subclass of
rather than a .requests.get('http://%zz/') # raises requests.exceptions.InvalidURLLastly, exceptions caused by incorrect chunked
encoding will now raise a Requests instead. -
The proxy API has changed slightly. The scheme for a proxy URL is now
required.proxies = { "http" "10.10.1.10:3128", # use http://10.10.1.10:3128 instead } # In requests 1.x, this was legal, in requests 2.x, # this raises requests.exceptions.MissingSchema requests.get("http://example.org", proxies=proxies)
Behavioural Changes
- Keys in the dictionary are now native strings on all Python
versions, i.e. bytestrings on Python 2 and unicode on Python 3. If the
keys are not native strings (unicode on Python 2 or bytestrings on Python 3)
they will be converted to the native string type assuming UTF-8 encoding. - Values in the dictionary should always be strings. This has
been the project’s position since before 1.0 but a recent change
(since version 2.11.0) enforces this more strictly. It’s advised to avoid
passing header values as unicode when possible.
Response Content
We can read the content of the server’s response. Consider the GitHub timeline
again:
>>> import requests

>>> r = requests.get('https://api.github.com/events')
>>> r.text
'[{"repository":{"open_issues":0,"url":"https://github.com/...
Requests will automatically decode content from the server. Most unicode
charsets are seamlessly decoded.
When you make a request, Requests makes educated guesses about the encoding of
the response based on the HTTP headers. The text encoding guessed by Requests
is used when you access . You can find out what encoding Requests is
using, and change it, using the property:
>>> r.encoding
'utf-8'
>>> r.encoding = 'ISO-8859-1'
If you change the encoding, Requests will use the new value of
whenever you call . You might want to do this in any situation where
you can apply special logic to work out what the encoding of the content will
be. For example, HTML and XML have the ability to specify their encoding in
their body. In situations like this, you should use to find the
encoding, and then set . This will let you use with
the correct encoding.
Python requests upload image
In the following example, we are going to upload an image. We create
a web application with Flask.
app.py
#!/usr/bin/env python3

import os
from flask import Flask, request

app = Flask(__name__)

@app.route("/")
def home():
    return 'This is home page'

@app.route("/upload", methods=)
def handleFileUpload():

    msg = 'failed to upload image'

    if 'image' in request.files:

        photo = request.files

        if photo.filename != '':

            photo.save(os.path.join('.', photo.filename))
            msg = 'image uploaded successfully'

    return msg

if __name__ == '__main__':
    app.run()
This is a simple application with two endpoints. The
endpoint checks if there is some image and saves it to the current directory.
upload_file.py
#!/usr/bin/env python3

import requests as req

url = 'http://localhost:5000/upload'

with open('sid.jpg', 'rb') as f:

    files = {'image': f}

    r = req.post(url, files=files)
    print(r.text)
We send the image to the Flask application. The file is specified
in the attribute of the method.
Получение SSL: ошибка CERTIFICATE_VERIFY_FAILED
Когда я впервые выполнил указанную выше программу, я получил следующую ошибку, связанную с сертификатами SSL.
$ python3.6 http_client.py
Traceback (most recent call last):
  File "http_client.py", line 4, in <module>
    connection.request("GET", "/")
  File "/Library/Frameworks/Python.framework/Versions/3.6/lib/python3.6/http/client.py", line 1239, in request
    self._send_request(method, url, body, headers, encode_chunked)
  File "/Library/Frameworks/Python.framework/Versions/3.6/lib/python3.6/http/client.py", line 1285, in _send_request
    self.endheaders(body, encode_chunked=encode_chunked)
  File "/Library/Frameworks/Python.framework/Versions/3.6/lib/python3.6/http/client.py", line 1234, in endheaders
    self._send_output(message_body, encode_chunked=encode_chunked)
  File "/Library/Frameworks/Python.framework/Versions/3.6/lib/python3.6/http/client.py", line 1026, in _send_output
    self.send(msg)
  File "/Library/Frameworks/Python.framework/Versions/3.6/lib/python3.6/http/client.py", line 964, in send
    self.connect()
  File "/Library/Frameworks/Python.framework/Versions/3.6/lib/python3.6/http/client.py", line 1400, in connect
    server_hostname=server_hostname)
  File "/Library/Frameworks/Python.framework/Versions/3.6/lib/python3.6/ssl.py", line 401, in wrap_socket
    context=self, session=session)
  File "/Library/Frameworks/Python.framework/Versions/3.6/lib/python3.6/ssl.py", line 808, in init
    self.do_handshake()
  File "/Library/Frameworks/Python.framework/Versions/3.6/lib/python3.6/ssl.py", line 1061, in do_handshake
    self._sslobj.do_handshake()
  File "/Library/Frameworks/Python.framework/Versions/3.6/lib/python3.6/ssl.py", line 683, in do_handshake
    self._sslobj.do_handshake()
ssl.SSLError:  certificate verify failed (_ssl.c:748)
$
Из вывода было ясно, что он должен что-то делать с сертификатами SSL. Но сертификат веб-сайта в порядке, так что это должно быть что-то с настройкой. После некоторого поиска в Google я обнаружил, что в MacOS нам нужно запустить файл Install Certificates.command, находящийся в каталоге установки в Python, чтобы исправить эту проблему. На изображении ниже показан результат выполнения этой команды, похоже, что он устанавливает последние сертификаты, которые будут использоваться при создании SSL-соединений.

Обратите внимание, что я получил эту ошибку в Mac OS. Однако в моей системе Ubuntu он работал отлично

Using the Translate API
So now let’s move on to something more interesting. We’ll use the Yandex Translate API to perform a request to translate some text to a different language.
To use the API, first you need to sign up. After you sign up, go to the Translate API and create an API key. Once you have the API key, add it to your file as a constant. Here’s the link where you can do all those things: https://tech.yandex.com/translate/

The reason why we need an API key is so Yandex can authenticate us every time we want to use their API. The API key is probably the simplest form of authentication, because it’s simply added on to the end of the request URL when being sent.
To know which URL we need to send to use the API, we can look at the documentation for Yandex here: https://tech.yandex.com/translate/doc/dg/reference/translate-docpage/
If we look there, we’ll see all the information needed to use their Translate API to translate text.
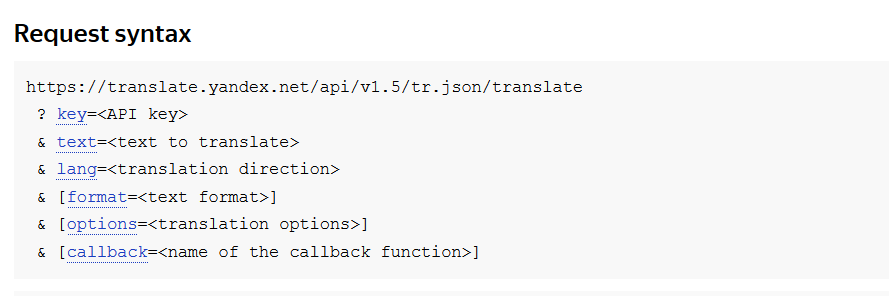
API documentation can be difficult to read at times, but in this case it’s simple. When we see a URL with ampersands (&), question marks (?), and equals signs (=), you can be sure that the URL is for GET requests. Those symbols specify the parameters that go along with the URL.
Normally things in square brackets ([]) will be optional. In this case, format, options, and callback are optional, while the key, text, and lang are required for the request.
And of course it’s easy to see the URL. So let’s add some code to send to that URL. You can replace the first request we created with this:
There are two ways we can add the parameters. We can either append it to the end of the URL directly, or we can have Requests do it for us. Having Requests do it for us is much easier.
To do that, we can create a dictionary for our parameters. The three items we need are the key, the text, and the language.
Let’s create the dictionary using the API key, ‘Hello’ for the text, and ‘en-es’ as the lang, which means we want to translate from English to Spanish.
If you need to know any other language codes, you can look here: https://en.wikipedia.org/wiki/List\_of\_ISO\_639-1\_codes You are looking for the 639-1 column.
We create a params dictionary by using the dict() function and passing in the keys and values we want in our dictionary.
Now we take the parameters dictionary and pass it to the .get() function.
When we pass the parameters this way, Requests will go ahead and add the parameters to the URL for us.
Now let’s add a print statement for the response text and view what gets returned in the response.

We see three things. We see the status code, which is exactly the same status code of the response itself, we see the language that we specified, and we see the translated text inside of the list. So you should see ‘Hola’ for the translated text.
Try again with en-fr as the language code, and you should see ‘Boujour’ in the response now.

Let’s take a look at the headers for this particular response.

Obviously the headers should be different because we’re communicating with a different server, but in this case the content type is application/json instead of text/html. What this means that the data can be interpreted as JSON.
When application/json is the content type of the response, we are able to have Requests convert the response to a dictionary and list so we can access the data easier.
To have the data parsed as JSON, we use the .json() method on the response object.
If you print it, you’ll see that the data looks the same, but the format is slightly different.

The reason why it’s different is because it’s no longer plain text that you get from res.text. This time it’s a printed version of a dictionary.
Let’s say we want to access the text. Since this is now a dictionary, we can use the text key.
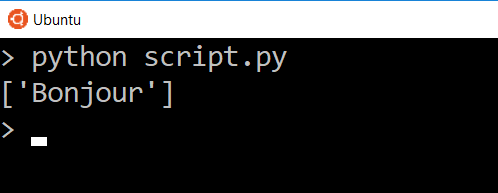
And now we only see the data for that one key. In this case we are looking at a list of one item, so if we wanted to get that text in the list directly, we can access it by the index.
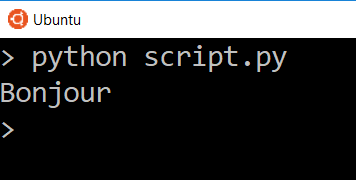
And now the only thing we see is the translated word.
So of course if we change things in our parameters, we’ll get different results. Let’s change the text to be translated from Hello to Goodbye, change the target language back to Spanish, and send the request again.
Try translating longer text in different languages and see what responses the API gives you.
Client Side Certificates
You can also specify a local cert to use as client side certificate, as a single
file (containing the private key and the certificate) or as a tuple of both
files’ paths:
>>> requests.get('https://kennethreitz.org', cert=('/path/client.cert', '/path/client.key'))
<Response >
or persistent:
s = requests.Session()
s.cert = '/path/client.cert'
If you specify a wrong path or an invalid cert, you’ll get a SSLError:
>>> requests.get('https://kennethreitz.org', cert='/wrong_path/client.pem')
SSLError:  _ssl.c:347: error:140B0009:SSL routines:SSL_CTX_use_PrivateKey_file:PEM lib
Debugging HTTP requests
Sometimes requests fail and you can’t figure out why. Logging the request and
response might give you insight to the failure. There are two ways to do this —
either by using the built in debug logging settings or by using request hooks.
Printing HTTP headers
Changing the logging debug level greater than 0 will log the response HTTP
headers. This is the simplest option, but it doesn’t allow you to see the HTTP
request or the response body. It’s useful if you’re dealing with an API that
returns a large body payload that is not suitable for logging or contains
binary content.
Any value that is greater than 0 will enable debug logging.
import requests
import http

http.client.HTTPConnection.debuglevel = 1

requests.get("https://www.google.com/")

# Output
send b'GET / HTTP/1.1\r\nHost: www.google.com\r\nUser-Agent: python-requests/2.22.0\r\nAccept-Encoding: gzip, deflate\r\nAccept: */*\r\nConnection: keep-alive\r\n\r\n'
reply 'HTTP/1.1 200 OK\r\n'
header Date Fri, 28 Feb 2020 121326 GMT
header Expires -1
header Cache-Control private, max-age=
Printing everything
If you want to log the entire HTTP lifecycle, including both the textual
representation of the request and response you can use request hooks and the
dump utils from requests_toolbelt.
I prefer this option any time I’m dealing with a REST based API that doesn’t
return very large responses.
import requests
from requests_toolbelt.utils import dump

def logging_hook(response, *args, **kwargs):
    data = dump.dump_all(response)
    print(data.decode('utf-8'))

http = requests.Session()
http.hooks"response" = logging_hook

http.get("https://api.openaq.org/v1/cities", params={"country" "BA"})

# Output
< GET v1cities?country=BA HTTP1.1
< Host api.openaq.org

> HTTP1.1 200 OK
> Content-Type applicationjson; charset=utf-8
> Transfer-Encoding chunked
> Connection keep-alive
>
{
   "meta":{
      "name""openaq-api",
      "license""CC BY 4.0",
      "website""https://docs.openaq.org/",
      "page"1,
      "limit"100,
      "found"1
   },
   "results":[
      {
         "country""BA",
         "name""Goražde",
         "city""Goražde",
         "count"70797,
         "locations"1
      }

}
See https://toolbelt.readthedocs.io/en/latest/dumputils.html
Объект Response
Response — это объект для проверки результатов запроса.
Давайте сделаем тот же запрос, но на этот раз сохраним его в переменную, чтобы мы могли более подробно изучить его атрибуты и поведение:
В этом примере вы захватили значение, возвращаемое значение , которое является экземпляром Response, и сохранили его в переменной response. Название переменной может быть любым.
Код ответа HTTP
Первый кусок данных, который можно получить из ответа — код состояния (он же код ответа HTTP). Код ответа информирует вас о состоянии запроса.
Например, статус означает, что ваш запрос был успешно выполнен, а статус означает, что ресурс не найден. Есть множество других ответов сервера, которые могут дать вам информацию о том, что произошло с вашим запросом.
Используя вы можете увидеть статус, который вернул вам в ответ сервер:
вернул 200 — это значит, что запрос успешно выполнен и сервер отдал вам запрашиваемые данные.
Иногда эту информацию можно использовать в коде для принятия решений:
Если сервер возвращает 200, то программа выведет , если код ответа 400, то программа выведет .
Requests делает еще один шаг к тому, чтобы сделать это проще. Если вы используете экземпляр Response в условном выражении, то он получит значение , если код ответа между 200 и 400, и False во всех остальных случаях.
Поэтому вы можете сделать проще последний пример, переписав :
Помните, что этот метод не проверяет, что код состояния равен 200.
Причиной этого является то, что ответы с кодом в диапазоне от 200 до 400, такие как и , тоже считаются истинными, так как они дают некоторый обрабатываемый ответ.
Например, статус 204 говорит о том, что запрос был успешным, но в теле ответа нет содержимого.
Поэтому убедитесь, что вы используете этот сокращенный вид записи, только если хотите узнать был ли запрос успешен в целом. А затем обработать код состояния соответствующим образом.
Если вы не хотите проверять код ответа сервера в операторе , то вместо этого вы можете вызвать исключение, если запрос был неудачным. Это можно сделать вызвав :
Если вы используете , то HTTPError сработает только для определенных кодов состояния. Если состояние укажет на успешный запрос, то исключение не будет вызвано и программа продолжит свою работу.
Теперь вы знаете многое о том, что делать с кодом ответа от сервера. Но когда вы делаете GET-запрос, вы редко заботитесь только об ответе сервера — обычно вы хотите увидеть больше.
Далее вы узнаете как просмотреть фактические данные, которые сервер отправил в теле ответа.
Content
Ответ на Get-запрос, в теле сообщения часто содержит некую ценную информацию, известную как «полезная нагрузка» («Payload»). Используя атрибуты и методы Response, вы можете просматривать payload в разных форматах.
Чтобы увидеть содержимое ответа в байтах, используйте :
Пока дает вам доступ к необработанным байтам полезной нагрузки ответа, вы можете захотеть преобразовать их в строку с использованием кодировки символов UTF-8. Response это сделает за вас, когда вы укажите :
Поскольку для декодирования байтов в строки требуется схема кодирования, Requests будет пытаться угадать кодировку на основе заголовков ответа. Вы можете указать кодировку явно, установив перед указанием :
Если вы посмотрите на ответ, то вы увидите, что на самом деле это последовательный JSON контент. Чтобы получить словарь, вы можете взять строку, которую получили из и десериализовать ее с помощью . Однако, более простой способ сделать это — использовать .
Тип возвращаемого значения — это словарь, поэтому вы можете получить доступ к значениям в объекте по ключу.
Вы можете делать многое с кодом состояний и телом сообщений. Но если вам нужна дополнительная информация, такая как метаданные о самом ответе, то вам нужно взглянуть на заголовки ответа.
Заголовки
Заголовки ответа могут дать вам полезную информацию, такую как тип ответа и ограничение по времени, в течение которого необходимо кэшировать ответ.
Чтобы посмотреть заголовки, укажите :
возвращает похожий на словарь объект, позволяющий получить доступ к значениям объекта по ключу. Например, чтобы получить тип содержимого ответа, вы можете получить доступ к Content-Type:
Используя ключ или — вы получите одно и то же значение.
Теперь вы узнали основное о Response. Вы увидели его наиболее используемые атрибуты и методы в действии. Давайте сделаем шаг назад и посмотрим как изменяются ответы при настройке Get-запросов.
The Message Body
According to the HTTP specification, , , and the less common requests pass their data through the message body rather than through parameters in the query string. Using , you’ll pass the payload to the corresponding function’s parameter.
takes a dictionary, a list of tuples, bytes, or a file-like object. You’ll want to adapt the data you send in the body of your request to the specific needs of the service you’re interacting with.
For example, if your request’s content type is , you can send the form data as a dictionary:
>>>
You can also send that same data as a list of tuples:
>>>
If, however, you need to send JSON data, you can use the parameter. When you pass JSON data via , will serialize your data and add the correct header for you.
httpbin.org is a great resource created by the author of , Kenneth Reitz. It’s a service that accepts test requests and responds with data about the requests. For instance, you can use it to inspect a basic request:
>>>
Эффективная обработка файлов
Одна из функций парсера – это хранение данных как в базе данных, так и в обычных файлах, таких как CSV/Text. Если собираете большой объем данных, это не означает, что операция ввода-вывода будет в цикле. Давайте рассмотрим, как это делается.
Пробуем:
Python
try:
a_list_variable = []
a_list_variable.extend(a_func_return_record())
except requests.ConnectionError as e:
print(«Упс!! Ошибка подключения к интернету.»)
print(str(e))
except requests.Timeout as e:
print(«Упс!! Время ожидания истекло.»)
print(str(e))
except requests.RequestException as e:
print(«Упс!! Возникла непредвиденная ошибка!»)
print(str(e))
except KeyboardInterrupt:
print(«Кто-то закрыл принудительно программу.»)
finally:
print(«Total Records = » + str(len(property_urls)))
try:
# файл для хранения URL
record_file = open(‘records_file.txt’, ‘a+’)
record_file.write(«\n».join(property_urls))
record_file.close()
except Exception as ex:
print(«Возникла ошибка при сохранении данных, текст ошибки:»)
print(str(e))
|
1 2 3 4 5 6 7 8 9 10 11 12 13 14 15 16 17 18 19 20 21 22 23 24 |
try a_list_variable= a_list_variable.extend(a_func_return_record()) exceptrequests.ConnectionError ase print(«Упс!! Ошибка подключения к интернету.») print(str(e)) exceptrequests.Timeout ase print(«Упс!! Время ожидания истекло.») print(str(e)) exceptrequests.RequestException ase print(«Упс!! Возникла непредвиденная ошибка!») print(str(e)) exceptKeyboardInterrupt print(«Кто-то закрыл принудительно программу.») finally print(«Total Records = «+str(len(property_urls))) try # файл для хранения URL record_file=open(‘records_file.txt’,’a+’) record_file.write(«\n».join(property_urls)) record_file.close() exceptExceptionasex print(«Возникла ошибка при сохранении данных, текст ошибки:») print(str(e)) |
Здесь я вызываю функцию (хотя вы не обязаны делать то же самое), которая добавляет записи в список. Как только это будет сделано, или программа будет остановлена, перед завершением она просто сохранит весь список в файл за раз. Намного лучше, чем несколько операций ввода-вывода
Надеюсь, эта статья была для вас полезной. Пожалуйста, Поделитесь своим опытом о том, как сделать парсер более эффективным!
Setting base URLs
Suppose you are only using one API hosted at api.org. You’ll end up repeating
the protocol and domain for every http call:
requests.get('https://api.org/list/')
requests.get('https://api.org/list/3/item')
You can save yourself some typing by using
.
This allows you to specify the base url for the HTTP client and to only specify
the resource path at the time of the request.
from requests_toolbelt import sessions
http = sessions.BaseUrlSession(base_url="https://api.org")
http.get("/list")
http.get("/list/item")
Note that the requests toolbelt isn’t
included in the default requests installation, so you’ll have to install it
separately.
PHP POST request in Laravel
In the following example, we send a POST request from an HTML form.
resources/views/home.blade.php
<!DOCTYPE html>
<html lang="en">
    <head>
        <meta charset="utf-8">
        <meta name="viewport" content="width=device-width, initial-scale=1">
        <title>Home page</title>
        <style>
            .alert { color: red}
        </style>
    </head>
    <body>
        @if ($errors->any())
        <div class="alert">
            <ul>
                @foreach ($errors->all() as $error)
                    <li>{{ $error }}</li>
                @endforeach
            </ul>
        </div>
        @endif
         <form action="process_form" method="post">
            @csrf
            <label for="name">Name</label> <input id="name"
                value="{{old('name')}}"type="text" name="name">
            <label for="message">Message</label> <input id="message"
                value="{{old('message')}}" type="text" name="message">
            <button type="submit">Submit</button>
        </form>
    </body>
</html>
We have a POST form in a Blade template. Laravel requires CSRF protection for
POST requests. We enable CSRF protection with .
routes/web.php
<?php

use Illuminate\Support\Facades\Route;
use Illuminate\Http\Request;

Route::get('/', function () {
    return view('home');
});


Route::post('/process_form', function (Request $request) {

    $request->validate();

    $name = $request->input('name');
    $message = $request->input('message');

    $output = "$name says: $message";

    return $output;
});
We validate and retrieve the POST parameters and send them in the response.
This example should be tested in a browser.
In this tutorial, we have worked with GET and POST requests in plain PHP,
Symfony, Slim, and Laravel.
List tutorials.
Заголовки HTTP в Requests
HTTP-заголовки ответов на запросы тоже могут дать нам полезную информацию. Например, тип содержимого ответного payload либо ограничения по времени для кэширования ответа. Чтобы посмотреть заголовок, надо заглянуть в атрибут .headers. Вот, как это может выглядеть:
    >>> response.headers
{'Server' 'GitHub.com', 'Date' 'Mon, 10 Dec 2018 17:49:54 GMT', 'Content-Type' 'application/json; charset=utf-8', 'Transfer-Encoding' 'chunked', 'Status' '200 OK', 'X-RateLimit-Limit' '60', 'X-RateLimit-Remaining' '59', 'X-RateLimit-Reset' '1544467794', 'Cache-Control' 'public, max-age=60, s-maxage=60', 'Vary' 'Accept', 'ETag' 'W/"7dc470913f1fe9bb6c7355b50a0737bc"', 'X-GitHub-Media-Type' 'github.v3; format=json', 'Access-Control-Expose-Headers' 'ETag, Link, Location, Retry-After, X-GitHub-OTP, X-RateLimit-Limit, X-RateLimit-Remaining, X-RateLimit-Reset, X-OAuth-Scopes, X-Accepted-OAuth-Scopes, X-Poll-Interval, X-GitHub-Media-Type', 'Access-Control-Allow-Origin' '*', 'Strict-Transport-Security' 'max-age=31536000; includeSubdomains; preload', 'X-Frame-Options' 'deny', 'X-Content-Type-Options' 'nosniff', 'X-XSS-Protection' '1; mode=block', 'Referrer-Policy' 'origin-when-cross-origin, strict-origin-when-cross-origin', 'Content-Security-Policy' "default-src 'none'", 'Content-Encoding' 'gzip', 'X-GitHub-Request-Id' 'E439:4581:CF2351:1CA3E06:5C0EA741'}
Заголовок .headers возвращает словарь и предоставляет доступ к значению HTTP-заголовка по ключу. К примеру, чтобы посмотреть тип содержимого ответного payload, надо использовать Content-Type.
    >>> response.headers'Content-Type'
'application/json; charset=utf-8'
Согласно специфике HTTP, заголовки являются нечувствительными к регистру. Таким образом, при получении доступа к заголовкам мы можем не беспокоиться о том, какие буквы использованы: строчные либо прописные.
Это лишь базовые знания по теме библиотеки Requests в Python и HTTP-заголовков. Если хотите знать больше, вам могут быть полезны следующие статьи:
— «Requests в Python – Примеры выполнения HTTP-запросов»;
— «Краткое руководство по библиотеке Python Requests».
Что же умеет requests?
Для начала хочется показать как выглядит код работы с http, используя модули из стандартной библиотеки Python и код при работе с requests. В качестве мишени для стрельбы http запросами будет использоваться очень удобный сервис httpbin.org
Кстати, urllib.request это надстройка над «низкоуровневой» библиотекой httplib о которой я писал выше.
В простых методах запросов значительных отличий у них не имеется. Но давайте взглянем на работы с Basic Auth:
А теперь чувствуется разница между pythonic и non-pythonic? Я думаю разница на лицо. И несмотря на тот факт, что requests ничто иное как обёртка над urllib3, а последняя является надстройкой над стандартными средствами Python, удобство написания кода в большинстве случаев является приоритетом номер один.
В requests имеется:
- Множество методов http аутентификации
- Сессии с куками
- Полноценная поддержка SSL
- Различные методы-плюшки вроде .json(), которые вернут данные в нужном формате
- Проксирование
- Грамотная и логичная работа с исключениями
О последнем пункте мне бы хотелось поговорить чуточку подробнее.
PHP GET request in Symfony
In the following example, we process a GET request in a Symfony application.
$ symfony new symreq
$ cd symreq
A new application is created.
$ composer req annot
$ composer req maker --dev
We install the and components.
$ php bin/console make:controller HomeController
We create a new controller.
src/Controller/HomeController.php
<?php

namespace App\Controller;

use Symfony\Bundle\FrameworkBundle\Controller\AbstractController;
use Symfony\Component\Routing\Annotation\Route;
use Symfony\Component\HttpFoundation\Response;
use Symfony\Component\HttpFoundation\Request;

class HomeController extends AbstractController
{
    /**
     * @Route("/", name="home", methods={"GET"})
     */
    public function index(Request $request): Response
    {
        $name = $request->query->get('name', 'guest');
        $message = $request->query->get('message', 'hello there');

        $output = "$name says: $message";

        return new Response($output, Response::HTTP_OK,
            ['content-type' => 'text/plain']);
    }
}
Inside the method,
we get the query parameters and create a response.
$name = $request->query->get('name', 'guest');
The GET parameter is retrieved with .
The second parameter of the method is a default value which is used when no
value was retrieved.
$ symfony serve
We start the server.
$ curl 'localhost:8000/?name=Lucia&message=Cau'
Lucia says: Cau
We generate a GET request with curl.
Conclusion
You’ve come a long way in learning about Python’s powerful library.
You’re now able to:
- Make requests using a variety of different HTTP methods such as , , and
- Customize your requests by modifying headers, authentication, query strings, and message bodies
- Inspect the data you send to the server and the data the server sends back to you
- Work with SSL Certificate verification
- Use effectively using , , Sessions, and Transport Adapters
Because you learned how to use , you’re equipped to explore the wide world of web services and build awesome applications using the fascinating data they provide.
Необработанное содержимое ответа
В редких случаях, когда вы хотите получить доступ к сырому ответу сервера на уровне сокета, вы можете обратиться к . Если вы хотите сделать это, убедитесь, что вы установили в вашем первом запросе. После этого вы уже можете проделать следующее:
>>> r = requests.get('https://api.github.com/events', stream=True)
>>> r.raw
<requests.packages.urllib3.response.HTTPResponse object at 0x101194810>
>>> r.raw.read(10)
'\x1f\x8b\x08\x00\x00\x00\x00\x00\x00\x03'
Теперь вы можете использовать подобный код как шаблон, чтобы сохранить получаемый поток в файл:
>>> with open(filename, 'wb') as fd:
>>>     for chunk in r.iter_content(chunk_size):
>>>         fd.write(chunk)
Использование будет обрабатывать многое из того, с чем бы вам пришлось иметь дело при использовании напрямую. Описанное выше является предпочтительным и рекомендуемым способом извлечения содержимого при потоковой загрузке.
POST Multiple Multipart-Encoded Files
You can send multiple files in one request. For example, suppose you want to
upload image files to an HTML form with a multiple file field ‘images’:
<input type="file" name="images" multiple="true" required="true"/>
To do that, just set files to a list of tuples of :
>>> url = 'https://httpbin.org/post'
>>> multiple_files =
...     ('images', ('foo.png', open('foo.png', 'rb'), 'image/png')),
...     ('images', ('bar.png', open('bar.png', 'rb'), 'image/png'))]
>>> r = requests.post(url, files=multiple_files)
>>> r.text
{
  ...
  'files': {'images': 'data:image/png;base64,iVBORw ....'}
  'Content-Type': 'multipart/form-data; boundary=3131623adb2043caaeb5538cc7aa0b3a',
  ...
}
Parameter Values
| Parameter | Description | |
|---|---|---|
| url | Try it | Required. The url of the request |
| data | Try it | Optional. A dictionary, list of tuples, bytes or a file object to send to the specified url |
| json | Try it | Optional. A JSON object to send to the specified url |
| files | Try it | Optional. A dictionary of files to send to the specified url |
| allow_redirects | Try it | Optional. A Boolean to enable/disable redirection.Default (allowing redirects) |
| auth | Try it | Optional. A tuple to enable a certain HTTP authentication.Default |
| cert | Try it | Optional. A String or Tuple specifying a cert file or key.Default |
| cookies | Try it | Optional. A dictionary of cookies to send to the specified url.Default |
| headers | Try it | Optional. A dictionary of HTTP headers to send to the specified url.Default |
| proxies | Try it | Optional. A dictionary of the protocol to the proxy url.Default |
| stream | Try it | Optional. A Boolean indication if the response should be immediately downloaded (False) or streamed (True).Default |
| timeout | Try it | Optional. A number, or a tuple, indicating how many seconds to wait for the client to make a connection and/or send a response.Default which means the request will continue until the connection is closed |
| verify |
Try it Try it |
Optional. A Boolean or a String indication to verify the servers TLS certificate or not.Default |
http.client
См.также
- https://docs.python.org/2/library/httplib.html
- https://docs.python.org/3/library/http.client.html
представляет собой простую обертку вокруг модуля
, которая обеспечивает наибольший контроль при обращении
к web-сайту.
Отправка запроса.
import http.client
conn = http.client.HTTPConnection("lectureswww.readthedocs.org")
conn.request("GET", "/ru/latest/")
r1 = conn.getresponse()
print(r1.status)

data1 = r1.read()
conn.request("GET", "/parrot.spam")
r2 = conn.getresponse()
print(r2.status)

data2 = r2.read()
conn.close()
200
404
В переменных , хранится тело ответа.
запрос, с использованием модуля для
преобразования Python словаря в строку параметров для HTTP запроса:
import http.client
import urllib.parse

params = urllib.parse.urlencode(
    {'@number' 12524, '@type' 'issue', '@action' 'show'}
)
headers = {"Content-type" "application/x-www-form-urlencoded",
           "Accept" "text/plain"}
conn = http.client.HTTPConnection("bugs.python.org")
conn.request("POST", "", params, headers)
response = conn.getresponse()
print(response.status, response.reason)

data = response.read()
print(data)

conn.close()