Screaming frog seo spider
Содержание:
Small Update – Version 14.1 Released 7th December 2021
We have just released a small update to version 14.1 of the SEO Spider. This release is mainly bug fixes and small improvements –
- Fix ‘Application Not Responding’ issue which affected a small number of users on Windows.
- Maintain Google Sheets ID when overwriting.
- Improved messaging in Force-Directed Crawl Diagram scaling configuration, when scaling on items that are not enabled (GA etc).
- Removed .xml URLs from appearing in the ‘Non-Indexable URLs in Sitemap’ filter.
- Increase the size of Custom Extraction text pop-out.
- Allow file name based on browse selection in location chooser.
- Add AMP HTML column to internal tab.
- Fix crash in JavaScript crawling.
- Fix crash when selecting ‘View in Internal Tab Tree View’ in the the Site Structure tab.
- Fix crash in image preview details window.
Other Updates
Version 13.0 also includes a number of smaller updates and bug fixes, outlined below.
- The has been updated with the new Core Web Vitals metrics (Largest Contentful Paint, First Input Delay and Cumulative Layout Shift). ‘Total Blocking Time’ Lighthouse metric and ‘Remove Unused JavaScript’ opportunity are also now available. Additionally, we’ve introduced a new ‘JavaScript Coverage Summary’ report under ‘Reports > PageSpeed’, which highlights how much of each JavaScript file is unused across a crawl and the potential savings.
- Following the Log File Analyser version 4.0, the SEO Spider has been updated to Java 11. This means it can only be used on 64-bit machines.
- iFrames can now be stored and crawled (under ‘Config > Spider > Crawl’).
- Fragments are no longer crawled by default in JavaScript rendering mode. There’s a new ‘Crawl Fragment Identifiers’ configuration under ‘Config > Spider > Advanced’ that allows you to crawl URLs with fragments in any rendering mode.
- A tonne of Google features for structured data validation have been updated. We’ve added support for COVID-19 Announcements and Image Licence features. Occupation has been renamed to Estimated Salary and two deprecated features, Place Action and Social Profile, have been removed.
- All Hreflang ‘confirmation links’ named filters have been updated to ‘return links’, as this seems to be the common naming used by Google (and who are we to argue?). Check out our How To Audit Hreflang guide for more detail.
- Two ‘AMP’ filters have been updated, ‘Non-Confirming Canonical’ has been renamed to ‘Missing Non-AMP Return Link’, and ‘Missing Non-AMP Canonical’ has been renamed to ‘Missing Canonical to Non-AMP’ to make them as clear as possible. Check out our How To Audit & validate AMP guide for more detail.
- The ‘Memory’ configuration has been renamed to ‘Memory Allocation’, while ‘Storage’ has been renamed to ‘Storage Mode’ to avoid them getting mixed up. These are both available under ‘Config > System’.
- Custom Search results now get appended to the Internal tab when used.
- The Forms Based Authentication browser now shows you the URL you’re viewing to make it easier to spot sneaky redirects.
- Deprecated APIs have been removed for the .
That’s everything. If you experience any problems, then please do just let us know via our support and we’ll help as quickly as possible.
Thank you to everyone for all their feature requests, feedback, and bug reports. Apologies for anyone disappointed we didn’t get to the feature they wanted this time. We prioritise based upon user feedback (and a little internal steer) and we hope to get to them all eventually.
Now, go and download version 13.0 of the Screaming Frog SEO Spider and let us know what you think!
macOS
Open a terminal, found in the Utilities folder in the Applications folder, or directly using spotlight and typing: ‘Terminal’.
There are two ways to start the SEO Spider from the command line. You can use either the open command or the ScreamingFrogSEOSpiderLauncher script. The open command returns immediately allowing you to close the Terminal after. The ScreamingFrogSEOSpiderLauncher logs to the Terminal until the SEO Spider exits, closing the Terminal kills the SEO Spider.
To start the UI using the open command:
open "/Applications/Screaming Frog SEO Spider.app"
To start the UI using the ScreamingFrogSEOSpiderLauncher script:
/Applications/Screaming\ Frog\ SEO\ Spider.app/Contents/MacOS/ScreamingFrogSEOSpiderLauncher
To see a full list of the command line options available:
/Applications/Screaming\ Frog\ SEO\ Spider.app/Contents/MacOS/ScreamingFrogSEOSpiderLauncher --help

The following examples we show both ways of launching the SEO Spider.
To open a saved crawl file:
open "/Applications/Screaming Frog SEO Spider.app" --args /tmp/crawl.seospider
/Applications/Screaming\ Frog\ SEO\ Spider.app/Contents/MacOS/ScreamingFrogSEOSpiderLauncher /tmp/crawl.seospider
To start the UI and immediately start crawling:
open "/Applications/Screaming Frog SEO Spider.app" --args --crawl https://www.example.com/
/Applications/Screaming\ Frog\ SEO\ Spider.app/Contents/MacOS/ScreamingFrogSEOSpiderLauncher --crawl https://www.example.com/
To start headless, immediately start crawling and save the crawl along with Internal->All and Response Codes->Client Error (4xx) filters:
open "/Applications/Screaming Frog SEO Spider.app" --args --crawl https://www.example.com --headless --save-crawl --output-folder /tmp/cli --export-tabs "Internal:All,Response Codes:Client Error (4xx)"
/Applications/Screaming\ Frog\ SEO\ Spider.app/Contents/MacOS/ScreamingFrogSEOSpiderLauncher --crawl https://www.example.com --headless --save-crawl --output-folder /tmp/cli --export-tabs "Internal:All,Response Codes:Client Error (4xx)"
Please see the full list of available to supply as arguments for the SEO Spider.
What Is SEO?
Search Engine Optimisation (SEO) is the practice of increasing the number and quality of visitors to a website by improving rankings in the algorithmic search engine results.
Research shows that websites on the first page of Google receive almost 95% of clicks, and studies show that results that appear higher up the page receive an increased click through rate (CTR), and more traffic.

The algorithmic (‘natural’, ‘organic’, or ‘free’) search results are those that appear directly below the top pay-per-click adverts in Google, as highlighted below.

There are also various other listings that can appear in the Google search results, such as map listings, videos, the knowledge graph and more. SEO can include improving visibility in these result sets as well.
Get your URLs
To get started you’ll need to change all your existing domain URLs from this:https://www.screamingfrog.co.uk/
into thishttps://developers.google.com/speed/pagespeed/insights/?url=screamingfrog.co.uk/
So go ahead and grab an excel list of every single URL you’d like some page speed data on, if you don’t have a list already, just give your site a crawl and take it straight from the tool, or download via the sitemap.
Next, you’ll need to add a cell containing the default Page Speed Insights URL:https://developers.google.com/speed/pagespeed/insights/?url=
Once that’s in just use a quick formula in the adjacent cell to join them together into your nice PSI friendly URL.
=$A$1&B1
Once this is copied down it should look similar this:

Adjust your settings
Now you’ve got the URLs sorted you’ll need to make sure Google doesn’t realise you’re using a bot and bring down the Captcha hammer on you straight away.
- Switch the tool over to list mode, (on the top menu > Mode > List).
- Head over to the rendering panel sitting under Configuration > Spider > Rendering- turn on JavaScript rendering, we also want to increase the AJAX timeout from 5 seconds to 15-20 for safe measure.
- Go to the speed panel (Configuration > Speed) turn the max threads to 1 and the Max URL/s to somewhere between 0.1 & 0.5 a second. You might need to play around with this to find what works for you.
1) Scheduling
You can now to run automatically within the SEO Spider, as a one off, or at chosen intervals.

You’re able to pre-select the (spider, or list), saved , as well as APIs (, , , , ) to pull in any data for the scheduled crawl.

You can also automatically file and export any of the tabs, filters, , or XML Sitemaps to a chosen location.

This should be super useful for anyone that runs regular crawls, has clients that only allow crawling at certain less-than-convenient ‘but, I’ll be in bed!’ off-peak times, uses crawl data for their own automatic reporting, or have a developer that needs a broken links report sent to them every Tuesday by 7 am.
The keen-eyed among you may have noticed that the SEO Spider will run in headless mode (meaning without an interface) when scheduled to export data – which leads us to our next point.
10) Improved Redirect & Canonical Chain Reports
The SEO Spider now reports on canonical chains and ‘mixed chains’, which can be found in the renamed ‘Redirect & Canonical Chains’ report.

For example, the SEO Spider now has the ability to report on mixed chain scenarios such as, redirect to a URL which is canonicalised to another URL, which has a meta refresh to another URL, which then JavaScript redirects back to the start URL. It will identify this entire chain, and report on it.
The updated report has also been updated to have fixed position columns for the start URL, and final URL in the chain, and reports on the indexability and indexability status of the final URL to make auditing more efficient to see if a redirect chain ends up at a ‘noindex’ or ‘error’ page etc. The full hops in the chain are still reported as previously, but in varying columns afterwards.
This means auditing redirects is significantly more efficient, as you can quickly identify the start and end URLs, and discover the chain type, the number of redirects and the indexability of the final target URL immediately. There’s also flags for chains where there is a loop, or have a temporary redirect somewhere in the chain.
There simply isn’t a better tool anywhere for auditing redirects at scale, and while a feature like visualisations might receive all the hype, this is significantly more useful for technical SEOs in the trenches every single day. Please read our updated guide on auditing redirects in a site migration.
Mode (режимы сканирования)
Выбираем режимы сканирования сайта.
Spider – классический парсинг сайта по внутренним ссылкам, вводим домен в адресную строку.
List – парсим только предварительно собранный список URL-адресов. Указать их можно несколькими способами:
- From a File – выгружаем URL-адреса из файла.
- Paste – выгружаем URL-адреса из буфера обмена.
- Enter Manually – вводим вручную в соответствующее поле.
- Download Sitemap – выгружаем их из карты сайта.
SERP Mode – режим не для сканирования: в нем можно загружать метаданные сайта, редактировать и тестировать для понимания дальнейшего отображения в браузере.
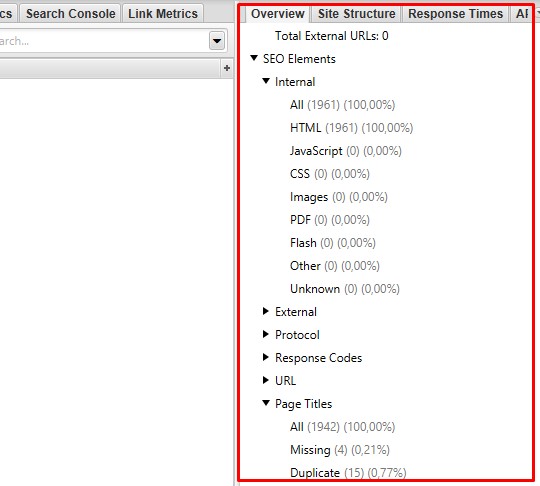
После парсинга информацию можно посмотреть в соответствующих отчетах вверху:

С помощью данных настроек можно решить ряд как простых, так и сложных задач в рамках аудита сайта. В других статьях мы будем их рассматривать.
Источник
3) Store & View HTML & Rendered HTML
You can now choose to store both the raw HTML and rendered HTML to inspect the DOM (when in JavaScript rendering mode) and view them in the lower window ‘view source’ tab.

This is super useful for a variety of scenarios, such as debugging the (you shouldn’t need to use WireShark anymore), or just when analysing how JavaScript has been rendered, and whether certain elements are within the code.

You can view the original HTML and rendered HTML at the same time, to compare the differences, which can be particularly useful when elements are dynamically constructed by JavaScript.
You can turn this feature on under ‘Configuration > Spider > Advanced’ and ticking the appropriate ‘Store HTML’ & ‘Store Rendered HTML’ options, and also export all the HTML code by using the ‘Bulk Export > All Page Source’ top-level menu.
We have some additional features planned here, to help users identify the differences between the static and rendered HTML.
Closing Thoughts
The guide above should help you identify JavaScript websites and crawl them efficiently using the Screaming Frog SEO Spider tool in mode.
While we have performed plenty of research internally and worked hard to mimic Google’s own rendering capabilities, a crawler is still only ever a simulation of real search engine bot behaviour.
We highly recommend using log file analysis and Google’s own URL Inspection Tool, or using the relevant version of Chrome to fully understand what they are able to crawl, render and index, alongside a JavaScript crawler.
Additional Reading
- Understand the JavaScript SEO Basics – From Google.
- Core Principles of JS SEO – From Justin Briggs.
- Progressive Web Apps Fundamentals Guide – From Builtvisible.
- Crawling JS Rich Sites – From Onely.
If you experience any problems when crawling JavaScript, or encounter any differences between how we render and crawl, and Google, we’d love to hear from you. Please get in touch with our support team directly.
5) rel=“next” and rel=“prev” Elements Now Crawled
The SEO Spider can now crawl rel=“next” and rel=“prev” elements whereas previously the tool merely reported them. Now if a URL has not already been discovered, the URL will be added to the queue and the URLs will be crawled if the configuration is enabled (‘Configuration > Spider > Basic Tab > Crawl Next/Prev’).
rel=“next” and rel=“prev” elements are not counted as ‘Inlinks’ (in the lower window tab) as they are not links in a traditional sense. Hence, if a URL does not have any ‘Inlinks’ in the crawl, it might well be due to discovery from a rel=“next” and rel=“prev” or a canonical. We recommend using the ‘Crawl Path Report‘ to show how the page was discovered, which will show the full path.
There’s also a new ‘respect next/prev’ configuration option (under ‘Configuration > Spider > Advanced tab’) which will hide any URLs with a ‘prev’ element, so they are not considered as duplicates of the first page in the series.
Small Update – Version 11.1 Released 13th March 2019
We have just released a small update to version 11.1 of the SEO Spider. This release is mainly bug fixes and small improvements –
- Add 1:1 hreflang URL report, available under ‘Reports > Hreflang > All hreflang URLs’.
- Cleaned up the preset user-agent list.
- Fix issue reading XML sitemaps with leading blank lines.
- Fix issue with parsing and validating structured data.
- Fix issue with list mode crawling more than the list.
- Fix issue with list mode crawling of XML sitemaps.
- Fix issue with scheduling UI unable to delete/edit tasks created by 10.x.
- Fix issue with visualisations, where the directory tree diagrams were showing the incorrect URL on hover.
- Fix issue with GA/GSC case insensitivty and trailing slash options.
- Fix crash when JavaScript crawling with cookies enabled.
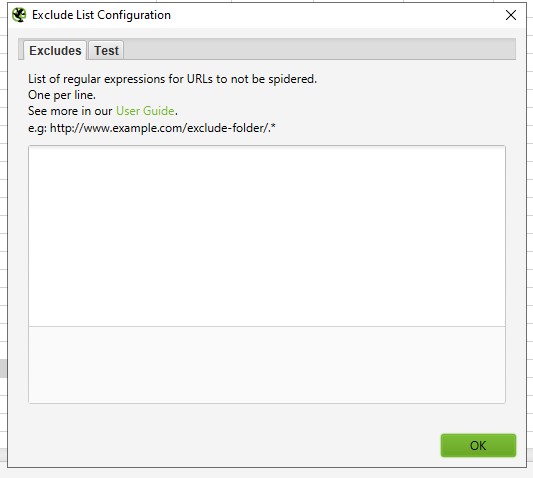
Include/Exclude (включение и исключение папок при парсинге)
Во вкладке Include мы вписываем выражения для парсинга только указанных папок, во вкладке Exclude – исключения, для парсинга всех, кроме указанных.
Разберем логику на примере вкладки Exclude:
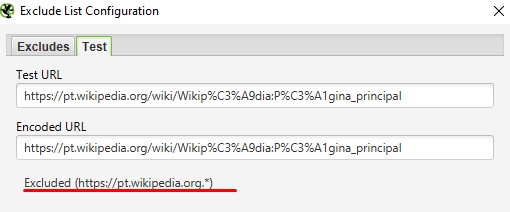
Чтобы проверить выражение, можно использовать вкладку Test. Например, нужно запретить парсинг домена.
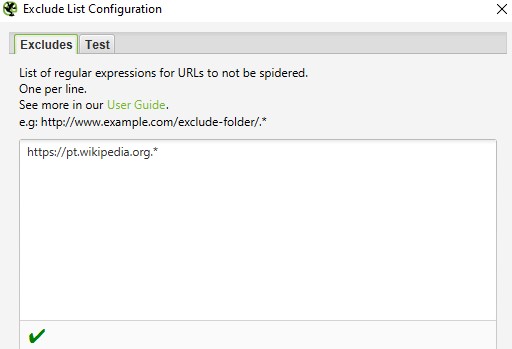
Если правило указано верно, то в Test при вводе нужного URL будет следующее:
Примеры других выражений:
Чтобы исключить конкретный URL или страницу: http://www.example.com/do-not-crawl-this-page.html
Чтобы исключить подкаталог или папку: http://www.example.com/do-not-crawl-this-folder/.*
Чтобы исключить все после бренда, где иногда могут быть другие папки: http://www.example.com/.*/brand.*
Если нужно исключить URL с определенным параметром, таким как price, содержащимся во множестве различных каталогов, можно использовать следующее выражение: .*\?price.*
Small Update – Version 9.2 Released 27th March 2018
We have just released a small update to version 9.2 of the SEO Spider. Similar to 9.1, this release addresses bugs and includes some small improvements as well.
- Speed up XML Sitemap generation exports.
- Add ability to cancel XML Sitemap exports.
- Add an option to start without initialising the Embedded Browser (Configuration->System->Embedded Browser). This is for users that can’t update their security settings, and don’t require JavaScript crawling.
- Increase custom extraction max length to 32,000 characters.
- Prevent users from setting database directory to read-only locations.
- Fix switching to tree view with a search in place shows “Searching” dialog, forever, and ever.
- Fix incorrect inlink count after re-spider.
- Fix crash when performing a search.
- Fix project saved failed for list mode crawl with hreflang data.
- Fix crash when re-spidering in list mode.
- Fix crash in ‘Bulk Export > All Page Source’ export.
- Fix webpage cut off in screenshots.
- Fix search in tree view, while crawling doesn’t keep up to date.
- Fix tree view export missing address column.
- Fix hreflang XML sitemaps missing namespace.
- Fix needless namespaces from XML sitemaps.
- Fix blocked by Cross-Origin Resource Sharing policy incorrectly reported during JavaScript rendering.
- Fix crash loading in large crawl in database mode.
5) HSTS Support
HTTP Strict Transport Security (HSTS) is a server directive that forces all connections over HTTPS. If any ‘insecure’ links are discovered in a crawl with a Strict-Transport-Security header set, the SEO Spider will show a 307 response with a status message of ‘HSTS Policy’.

The SEO Spider will request the HTTPS version as instructed, but highlight this with a 307 response (inline with browsers, such as Chrome), to help identify when HSTS and insecure links are used (rather than just requesting the secure version, and not highlighting that insecure links actually exist).
The search engines and browsers will only request the HTTPS version, so obviously the 307 response HSTS policy should not be considered as a real temporary redirect and ‘a redirect to fix’. John Mueller discussed this in a Google+ post last year.
Расширенное сканирование в режиме списка
Режим списка действительно эффективен при правильной настройке. Есть несколько интересных продвинутых способов применения, которые помогут вам сфокусировать анализ и сэкономить время и силы.
Сканирование списка URL-адресов и другого элемента
Режим списка может быть очень гибким и позволяет сканировать список загружаемых URL и другой элемент.
Например, если вы хотите просканировать список URL-адресов и их изображений. Или вам нужно было проверить список URL-адресов и их недавно реализованные канонические, AMP или hreflang, а не весь сайт. Или вы хотели собрать все внешние ссылки из списка URL-адресов для построения неработающих ссылок. Вы можете выполнить все это в режиме списка, и процесс практически такой же.
Перейдя в режим списка, удалите , которое автоматически устанавливается равным «0». Перейдите в «Конфигурация> Паук> Ограничения» и снимите флажок с конфигурации.

Это означает, что SEO Spider теперь будет сканировать ваш список URL-адресов – и все URL-адреса в том же субдомене, на который они ссылаются.
Поэтому вам необходимо контролировать, что именно сканируется, с помощью параметров детальной конфигурации. Перейдите в “Конфигурация> Паук> Сканирование”. Отключите все «Ссылки на ресурсы» и «Ссылки на страницы» в меню конфигурации для «Сканирование».
Затем выберите элементы, которые вы хотите сканировать, рядом со списком URL-адресов. Например, если вы хотите просканировать список URL-адресов и их изображений, настройка будет такой.

А если вы загрузите один URL, например страницу SEO Spider, вы увидите, что страница и ее изображения просканированы.

Эта расширенная настраиваемость позволяет проводить лазерный аудит именно тех элементов связи, которые вам нужны.
Аудит перенаправлений
Если вы проверяете перенаправления при миграции сайта, может быть особенно полезно сканировать их целевые URL-адреса и любые встречающиеся цепочки перенаправления. Это избавляет от необходимости загружать несколько списков целевых URL-адресов каждый раз, чтобы добраться до конца.
В этом случае мы рекомендуем использовать конфигурацию «всегда следовать перенаправлениям» в разделе «Конфигурация> Паук> Дополнительно». Включение этой конфигурации означает, что «предел глубины сканирования» игнорируется, и перенаправления будут выполняться до тех пор, пока они не достигнут ответа, отличного от 3XX (или вашего, пока не будет достигнут предел «» в разделе «Конфигурация> Паук> Ограничения»).

Если вы затем воспользуетесь отчетом «Все перенаправления», он отобразит полную цепочку перенаправлений в одном отчете.

Пожалуйста, прочтите наше руководство по аудиту перенаправлений при миграции сайта для получения более подробной информации об этом процессе.
Подключение к API
В режиме списка вы можете подключиться к API-интерфейсам , , и инструментов анализа обратных ссылок для получения данных. Например, вы можете подключиться к и получить такие данные, как ссылающиеся домены, ключевые слова, трафик и ценность, которые затем отображаются на вкладке «Показатели ссылок».

Это может быть очень полезно, например, при сборе данных для конкурентного анализа.
Ahrefs
Набор инструментов для seo-оптимизации сайта.
С их помощью можно осуществлять:
- аудит сайта,
- отслеживание позиций,
- анализ ключевых слов, контента и поисковых запросов клиентов.
Инструменты Ahrefs позволяют проводить исследование органического трафика, анализ обратных ссылок и платной выдачи любого сайта и URL. Они помогают провести аудит сайта, проверить его на наличие проблем с производительностью, количеством контента, социальными тегами и т. д., а также исправить их. Анализируют ключевые слова на основе данных 10 поисковых систем (Google, Amazon, YouTube, Baidu и др.) по расширенным метрикам, отображают частоту запросов по ключевым словам. Позволяют отслеживать позиции вашего сайта и сайтов-конкурентов в поисковой выдаче, предоставляют информацию о ранжировании в функциях SERP, видимости сайта и трафике.
Особенности:
- большая база данных (1 млрд. контентных страниц, 7 триллионов ключевых слов, 16 триллионов ссылок),
- база ключевых слов поддерживается в 171 стране и постоянно обновляется,
- есть возможность сравнения ссылочных профилей сайтов,
- есть набор бесплатных инструментов (анализатор ссылок, поисковой выдачи, авторитета сайта и др.),
- поддержка 24/5,
- доступна пробная версия, которая активизируется на 7 дней и стоит $7.
Web Scraping & Data Extraction Using The SEO Spider Tool
This tutorial walks you through how you can use the Screaming Frog SEO Spider’s custom extraction feature, to scrape data from websites.
The custom extraction feature allows you to scrape any data from the HTML of a web page using CSSPath, XPath and regex. The extraction is performed on the static HTML returned from URLs crawled by the SEO Spider, which return a 200 ‘OK’ response. You can switch to mode to extract data from the rendered HTML.
To jump to examples click one of the below links:
To get started, you’ll need to download & install the SEO Spider software and have a licence to access the custom extraction feature necessary for scraping. You can download via the buttons in the right hand side bar.
When you have the SEO Spider open, the next steps to start extracting data are as follows –
Building Functions & Strings with XPath Helper & Regex Search
The Spider is capable of doing some very cool stuff with the extraction feature, a lot of which is listed in our guide to web scraping and extraction. The trouble with much of this is it will require you to build your own XPath or regex string to lift your intended information.
While simply right-clicking > Copy XPath within the inspect window will usually do enough to scrape, by it’s not always going to cut it for some types of data. This is where two chrome extensions, XPath Helper & Regex- Search come in useful.
Unfortunately, these won’t automatically build any strings or functions, but, if you combine them with a cheat sheet and some trial and error you can easily build one out in Chrome before copying into the Spider to bulk across all your pages.
For example, say I wanted to get all the dates and author information of every article on our blog subfolder (https://www.screamingfrog.co.uk/blog/).

If you simply right clicked on one of the highlighted elements in the inspect window and hit Copy > Copy XPath, you would be given something like:
While this does the trick, it will only pull the single instance copied (‘16 January, 2019 by Ben Fuller’). Instead, we want all the dates and authors from the /blog subfolder.
By looking at what elements the reference is sitting in we can slowly build out an XPath function directly in XPath Helper and see what it highlights in Chrome. For instance, we can see it sits in a class of ‘main-blog–posts_single-inner–text–inner clearfix’, so pop that as a function into XPath Helper:
XPath Helper will then highlight the matching results in Chrome:

Close, but this is also pulling the post titles, so not quite what we’re after. It looks like the date and author names are sitting in a sub <p> tag so let’s add that into our function:

Bingo! Stick that in the custom extraction feature of the Spider (Configuration > Custom > Extraction), upload your list of pages, and watch the results pour in!

Regex Search works much in the same way: simply start writing your string, hit next and you can visually see what it’s matching as you’re going. Once you got it, whack it in the Spider, upload your URLs then sit back and relax.
Other Updates
Version 15.0 also includes a number of smaller updates and bug fixes, outlined below.
- Math Solvers and Practice Problems Google rich result features are now supported in structured data validation.
- There’s a new ‘Crawl Timestamp’ column in the Internal tab, which should help with automation, reporting and debugging.
- Project folders within the ‘File > Crawls’ menu are now collapsed by default.
- The URL bar will now default to HTTPS if you don’t specify the protocol.
- Fixed a blurry interface issue on high resolution screens on both Windows and Linux (for any scaling setting).
- Fixed many bugs that are too monotonous to include in any detail. You’re not even reading this last bullet point, so why am I writing it?
That’s all for now. We think these features help raise the SEO Spider to a new level, so hopefully, you find them useful. Please see our tutorial on ‘How To Compare Crawls‘ for more on how to use all the features released above. If you experience any issues, please let us know via support and we’ll help.
Thank you to everyone for all their feature requests, feedback, and continued support.
Now, go and download version 15.0 of the Screaming Frog SEO Spider and let us know what you think!
Installation
You can install the SEO Spider in one of two ways.
GUI
– Double click on the .deb file.
– Choose “Install” and enter your password.
– The SEO Spider requires the ttf-mscorefonts-install to be run, so accept the licence for this when it pops up.
– Wait for the installation to complete.
Command Line
Open up a terminal and enter the following command.
sudo apt-get install ~/Downloads/screamingfrogseospider_10.4_all.deb
You will need enter your password, then enter Y when asked if you want to continue and accept the ttf-mscorefonts-install installations EULA.
Troubleshooting
-
E: Unable to locate package screamingfrogseospider_10.4_all.deb
Please make sure you are entering an absolute path to the .deb to install as per the example.
-
Failed to fetch http://archive.ubuntu.com/ubuntu/pool/main/u/somepackage.deb 404 Not Found
Please run the following and try again.
sudo apt-get update